HP Deskpro 300 Compaq Deskpro Workstation 300 Hardware Reference Guide - Page 34
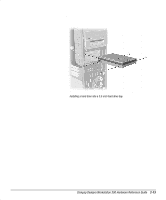
Installing a Hard Drive into a 5.25-Inch Drive Bay, drive as shown in the following illustration.
 |
View all HP Deskpro 300 manuals
Add to My Manuals
Save this manual to your list of manuals |
Page 34 highlights
Installing a Hard Drive into a 5.25-Inch Drive Bay To install a 3.5-inch hard drive into a half-height, 5.25-inch drive bay, the drive must be housed in an adapter. To install the drive and adapter: 1. Turn off the workstation and any external drives. Disconnect the power cord from the grounded AC outlet. Then remove the workstation access panel. See "Removing the Workstation Access Panel" in this chapter. 2. Remove the front bezel. See "Removing the Front Bezel" in this chapter. 3. To secure the drive to the adapter install the four screws into the drive as shown in the following illustration. 4. Install the guide screws into the hard drive adapter. 5. Install the adapter in the drive bay by sliding it into the front of the drive cage. The drivelock automatically secures the adapter when the drivelock snaps into place. Aligning the guide screws and installing a 3.5-inch drive Compaq Deskpro Workstation 300 Hardware Reference Guide 2-15
-
 1
1 -
2
-
3
-
4
-
5
-
6
-
7
-
8
-
9
-
10
-
11
-
12
-
13
-
14
-
15
-
16
-
17
-
18
-
19
-
20
-
21
-
22
-
23
-
24
-
25
-
26
-
27
-
28
-
 29
29 -
 30
30 -
 31
31 -
 32
32 -
 33
33 -
 34
34 -
 35
35 -
 36
36 -
 37
37 -
 38
38 -
 39
39 -
40
-
41
-
42
-
43
-
44
-
45
-
46
-
47
-
48
-
49
-
50
-
51
-
52
-
53
-
54
-
55
-
56
-
57
-
58
 |
 |
