HP Deskpro 300 Compaq Deskpro Workstation 300 Hardware Reference Guide - Page 37
While holding the drive casing, pull the drives out of the drive bay., Reassemble the workstation.
 |
View all HP Deskpro 300 manuals
Add to My Manuals
Save this manual to your list of manuals |
Page 37 highlights
❏ If the drive is in the desktop position, press the drivelock button to unlock the drive. Releasing the drives with the drivelock button 6. While releasing the drivelock, push from the back of the drives until the drive casing can be grasped from the front of the workstation. 7. While holding the drive casing, pull the drives out of the drive bay. 8. Store the drives in antistatic packaging. 9. Reassemble the workstation. 2-18 Hardware Upgrades
-
 1
1 -
2
-
3
-
4
-
5
-
6
-
7
-
8
-
9
-
10
-
11
-
12
-
13
-
14
-
15
-
16
-
17
-
18
-
19
-
20
-
21
-
22
-
23
-
24
-
25
-
26
-
27
-
28
-
29
-
30
-
31
-
 32
32 -
 33
33 -
 34
34 -
 35
35 -
 36
36 -
 37
37 -
 38
38 -
 39
39 -
 40
40 -
 41
41 -
 42
42 -
43
-
44
-
45
-
46
-
47
-
48
-
49
-
50
-
51
-
52
-
53
-
54
-
55
-
56
-
57
-
58
 |
 |

2-18
Hardware Upgrades
Compaq Confidential - Need to Know Required
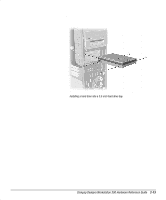
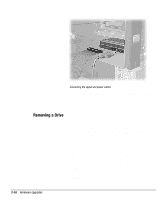
If the drive is in the desktop position, press the drivelock
button to unlock the drive.
Releasing the drives with the drivelock button
6.
While releasing the drivelock, push from the back of the drives
until the drive casing can be grasped from the front of the
workstation.
7.
While holding the drive casing, pull the drives out of the drive bay.
8.
Store the drives in antistatic packaging.
9.
Reassemble the workstation.