HP Desktop Pro G2 Maintenance and Service Guide - Page 74
Solving CD-ROM and DVD problems
 |
View all HP Desktop Pro G2 manuals
Add to My Manuals
Save this manual to your list of manuals |
Page 74 highlights
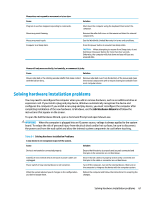
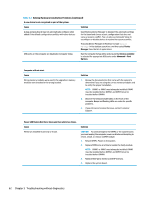
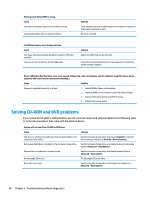
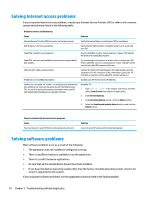
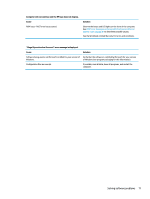
Memory count during POST is wrong. Cause The memory modules may not be installed correctly. Integrated graphics may use system memory. Solution Check that the memory modules have been installed correctly and that proper modules are used. No action required. Insufficient memory error during operation. Cause Too many Terminate and Stay Resident programs (TSRs) are installed. You have run out of memory for the application. Solution Delete any TSRs that you do not need. Check the memory requirements for the application or add more memory to the computer. Power LED flashes Red five times, once every second, followed by a two second pause, and the computer beeps five times. (Beeps stop after fifth iteration but LEDs continue flashing.) Cause Solution Memory is installed incorrectly or is bad. 1. Reseat DIMMs. Power on the system. 2. Replace DIMMs one at a time to isolate the faulty module. 3. Replace third-party memory with HP memory. 4. Replace the system board. Solving CD-ROM and DVD problems If you encounter CD-ROM or DVD problems, see the common causes and solutions listed in the following table or to the documentation that came with the optional device. System will not boot from CD-ROM or DVD drive. Cause The device is attached to a SATA port that has been hidden in the Computer Setup utility. Removable Media Boot is disabled in the Computer Setup utility. Network Boot is enabled in Computer Setup. Non-bootable CD in drive. Boot order not correct. Solution Run the Computer Setup utility and ensure Available is selected for the device's SATA port in Security > Device Security. Run the Computer Setup utility and enable booting to removable media in Advanced > Boot Options. Run the Computer Setup utility and disable Network Boot in Advanced > Boot Options. Try a bootable CD in the drive. Run the Computer Setup utility and change boot sequence in Advanced > Boot Options. 66 Chapter 5 Troubleshooting without diagnostics
-
 1
1 -
2
-
3
-
4
-
5
-
6
-
7
-
8
-
9
-
10
-
11
-
12
-
13
-
14
-
15
-
16
-
17
-
18
-
19
-
20
-
21
-
22
-
23
-
24
-
25
-
26
-
27
-
28
-
29
-
30
-
31
-
32
-
33
-
34
-
35
-
36
-
37
-
38
-
39
-
40
-
41
-
42
-
43
-
44
-
45
-
46
-
47
-
48
-
49
-
50
-
51
-
52
-
53
-
54
-
55
-
56
-
57
-
58
-
59
-
60
-
61
-
62
-
63
-
64
-
65
-
66
-
67
-
68
-
 69
69 -
 70
70 -
 71
71 -
 72
72 -
 73
73 -
 74
74 -
 75
75 -
 76
76 -
 77
77 -
 78
78 -
 79
79 -
80
-
81
-
82
-
83
-
84
-
85
-
86
-
87
-
88
-
89
-
90
-
91
-
92
-
93
-
94
-
95
-
96
-
97
-
98
-
99
-
100
-
101
-
102
-
103
-
104
-
105
-
106
-
107
-
108
-
109
-
110
-
111
-
112
-
113
-
114
-
115
-
116
-
117
 |
 |
