HP Desktop Pro G2 Maintenance and Service Guide - Page 83
Computer Setup—Configuration, Computer Setup-Security menu continued, Computer
 |
View all HP Desktop Pro G2 manuals
Add to My Manuals
Save this manual to your list of manuals |
Page 83 highlights
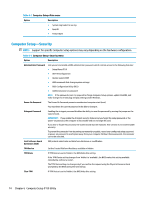
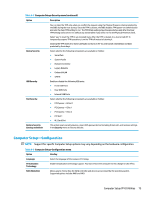
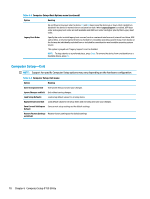
Table 6-2 Computer Setup-Security menu (continued) Option Description You can clear the TPM only when you confirm the request using the Physical Presence check prompted by the BIOS during the next startup. Once the TPM is cleared, the BIOS disables TPM power-on authentication and sets the Clear TPM setting to 'no'. The TPM State setting stays the same before and after the Clear TPM setting is also set to 'no' without any action taken if you select 'no' for the Physical Presence check. Select 'yes' to reset the TPM to an unowned state. After the TPM is cleared, it is also turned off. To temporarily suspend TPM operations, turn the TPM off instead of clearing it. Clearing the TPM resets it to factory defaults and turns it off. You will lose all created keys and data protected by those keys. Device Security Select whether the following components are available or hidden: ● Serial Port ● System Audio ● Network Controller ● Legacy Diskette ● Onboard WLAN ● SATA # USB Security Enable or disable the following USB ports: ● Front USB Ports ● Rear USB Ports ● Internal USB Ports Slot Security Select whether the following components are available or hidden: ● PCI Express ×16 Slot 1 ● PCI Express ×1 Slot 1 ● PCI Express ×1 Slot 2 ● PCI Slot 1 ● M.2 Card Slot Restore Security Settings to Default This action resets security devices, clears BIOS passwords (not including DriveLock), and restores settings in the Security menu to factory defaults. Computer Setup-Configuration NOTE: Support for specific Computer Setup options may vary depending on the hardware configuration. Table 6-3 Computer Setup-Configuration menu Option Heading Language Virtualization Technology SATA Emulation Select the language of the menus in F10 Setup. Enable virtualization technology support. You must restart the computer for this change to take effect. Allows you to choose how the SATA controller and devices are accessed by the operating system. Supported options include: RAID and AHCI. Computer Setup (F10) Utilities 75
-
 1
1 -
2
-
3
-
4
-
5
-
6
-
7
-
8
-
9
-
10
-
11
-
12
-
13
-
14
-
15
-
16
-
17
-
18
-
19
-
20
-
21
-
22
-
23
-
24
-
25
-
26
-
27
-
28
-
29
-
30
-
31
-
32
-
33
-
34
-
35
-
36
-
37
-
38
-
39
-
40
-
41
-
42
-
43
-
44
-
45
-
46
-
47
-
48
-
49
-
50
-
51
-
52
-
53
-
54
-
55
-
56
-
57
-
58
-
59
-
60
-
61
-
62
-
63
-
64
-
65
-
66
-
67
-
68
-
69
-
70
-
71
-
72
-
73
-
74
-
75
-
76
-
77
-
 78
78 -
 79
79 -
 80
80 -
 81
81 -
 82
82 -
 83
83 -
 84
84 -
 85
85 -
 86
86 -
 87
87 -
 88
88 -
89
-
90
-
91
-
92
-
93
-
94
-
95
-
96
-
97
-
98
-
99
-
100
-
101
-
102
-
103
-
104
-
105
-
106
-
107
-
108
-
109
-
110
-
111
-
112
-
113
-
114
-
115
-
116
-
117
 |
 |
