HP Desktop Pro G2 Maintenance and Service Guide - Page 92
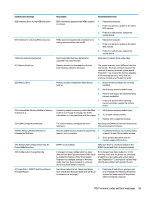
Control panel message, Description, Recommended action, 30C: Hard Disk 3-6: SMART Hard Drive
 |
View all HP Desktop Pro G2 manuals
Add to My Manuals
Save this manual to your list of manuals |
Page 92 highlights
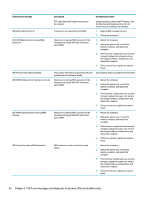
Control panel message 302-Hard Disk 2: SMART Hard Drive Detects Imminent Failure 309 - 30C: Hard Disk 3-6: SMART Hard Drive Detects Imminent Failure 3F0-Boot Device Not Found 3F1-Hard Disk 1 Error 3F2-Hard Disk 2 Error 400-Serial Port A Address Conflict Detected 401-Serial Port B Address Conflict Detected 402-Serial Port C Address Conflict Detected Description Recommended action 2. Apply hard drive firmware patch if applicable. (Available at http://www.hp.com/support.) 3. Back up contents and replace hard drive. Hard drive is about to fail. (Some hard drives 1. have a hard drive firmware patch that will fix an erroneous error message.) Determine if hard drive is giving correct error message. Run the Drive Protection System test under using F2 Diagnostics when booting the computer. 2. Apply hard drive firmware patch if applicable. (Available at http://www.hp.com/support.) 3. Back up contents and replace hard drive. Hard drive is about to fail. (Some hard drives 1. have a hard drive firmware patch that will fix an erroneous error message.) Determine if hard drive is giving correct error message. Run the Drive Protection System test under using F2 Diagnostics when booting the computer. 2. Apply hard drive firmware patch if applicable. (Available at http://www.hp.com/support.) 3. Back up contents and replace hard drive. Boot device not found. Insert boot device or load operating system. Hard disk 1 error. 1. Check and/or replace cables. 2. Clear CMOS. (See Password security and resetting CMOS on page 88.) 3. Replace the hard disk drive. Hard disk 2 error. 1. Check and/or replace cables. 2. Clear CMOS. (See Password security and resetting CMOS on page 88.) 3. Replace the hard disk drive. Both external and internal serial ports are assigned to the same resources. 1. Remove any serial port expansion cards. 2. Clear CMOS. (See Password security and resetting CMOS on page 88.) 3. Reconfigure card resources and/or run Computer Setup or Windows utilities. Both external and internal serial ports are assigned to the same resources. 1. Remove any serial port expansion cards. 2. Clear CMOS. (See Password security and resetting CMOS on page 88.) 3. Reconfigure card resources and/or run Computer Setup or Windows utilities. Both external and internal serial ports are assigned to the same resources. 1. Remove any serial port expansion cards. 2. Clear CMOS. (See Password security and resetting CMOS on page 88.) 3. Reconfigure card resources and/or run Computer Setup or Windows utilities. 84 Chapter 8 POST error messages and diagnostic front panel LEDs and audible codes
-
 1
1 -
2
-
3
-
4
-
5
-
6
-
7
-
8
-
9
-
10
-
11
-
12
-
13
-
14
-
15
-
16
-
17
-
18
-
19
-
20
-
21
-
22
-
23
-
24
-
25
-
26
-
27
-
28
-
29
-
30
-
31
-
32
-
33
-
34
-
35
-
36
-
37
-
38
-
39
-
40
-
41
-
42
-
43
-
44
-
45
-
46
-
47
-
48
-
49
-
50
-
51
-
52
-
53
-
54
-
55
-
56
-
57
-
58
-
59
-
60
-
61
-
62
-
63
-
64
-
65
-
66
-
67
-
68
-
69
-
70
-
71
-
72
-
73
-
74
-
75
-
76
-
77
-
78
-
79
-
80
-
81
-
82
-
83
-
84
-
85
-
86
-
 87
87 -
 88
88 -
 89
89 -
 90
90 -
 91
91 -
 92
92 -
 93
93 -
 94
94 -
 95
95 -
 96
96 -
 97
97 -
98
-
99
-
100
-
101
-
102
-
103
-
104
-
105
-
106
-
107
-
108
-
109
-
110
-
111
-
112
-
113
-
114
-
115
-
116
-
117
 |
 |
