HP EliteBook 8570w HP EliteBook 8570w Mobile Workstation Maintenance and Servi - Page 22
Right - smart card reader
 |
View all HP EliteBook 8570w manuals
Add to My Manuals
Save this manual to your list of manuals |
Page 22 highlights
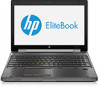
Right Component (1) Audio-out (headphone) jack (2) Audio-in (microphone) jack (3) USB 3.0 ports (2) (4) External monitor port (5) Smart card reader (6) Upgrade bay (optical drive shown) (7) Optical drive eject button (select models only) Description Produces sound when connected to optional powered stereo speakers, headphones, earbuds, a headset, or television audio. WARNING! To reduce the risk of personal injury, adjust the volume before putting on headphones, earbuds, or a headset. For additional safety information, see the Regulatory, Safety, and Environmental Notices. NOTE: When a device is connected to the jack, the computer speakers are disabled. Connects an optional computer headset microphone, stereo array microphone, or monaural microphone. Connect optional USB 3.0 compatible devices and provide enhanced USB power performance. Connects an external VGA monitor or projector. Supports optional smart cards. The upgrade bay can hold a protective insert, a hard drive, or an optical drive that reads an optical disc. NOTE: On select models, the optical drive also writes to an optical disc. Releases the disc tray. 14 Chapter 2 External Component Identification
-
 1
1 -
2
-
3
-
4
-
5
-
6
-
7
-
8
-
9
-
10
-
11
-
12
-
13
-
14
-
15
-
16
-
 17
17 -
 18
18 -
 19
19 -
 20
20 -
 21
21 -
 22
22 -
 23
23 -
 24
24 -
 25
25 -
 26
26 -
 27
27 -
28
-
29
-
30
-
31
-
32
-
33
-
34
-
35
-
36
-
37
-
38
-
39
-
40
-
41
-
42
-
43
-
44
-
45
-
46
-
47
-
48
-
49
-
50
-
51
-
52
-
53
-
54
-
55
-
56
-
57
-
58
-
59
-
60
-
61
-
62
-
63
-
64
-
65
-
66
-
67
-
68
-
69
-
70
-
71
-
72
-
73
-
74
-
75
-
76
-
77
-
78
-
79
-
80
-
81
-
82
-
83
-
84
-
85
-
86
-
87
-
88
-
89
-
90
-
91
-
92
-
93
-
94
-
95
-
96
-
97
-
98
-
99
-
100
-
101
-
102
-
103
-
104
-
105
-
106
-
107
-
108
-
109
-
110
-
111
-
112
-
113
-
114
-
115
-
116
-
117
-
118
-
119
-
120
-
121
-
122
-
123
-
124
-
125
-
126
-
127
-
128
-
129
-
130
-
131
-
132
-
133
-
134
-
135
-
136
-
137
-
138
-
139
-
140
-
141
-
142
-
143
-
144
-
145
-
146
-
147
-
148
-
149
-
150
-
151
-
152
-
153
-
154
-
155
-
156
-
157
-
158
-
159
-
160
-
161
-
162
-
163
-
164
-
165
-
166
-
167
 |
 |
