HP J4868A User Manual - Page 19
Install An Optional Transceiver, Installing a Transceiver, Transceiver, Notes
 |
View all HP J4868A manuals
Add to My Manuals
Save this manual to your list of manuals |
Page 19 highlights
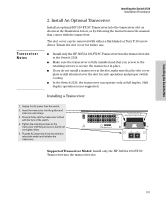
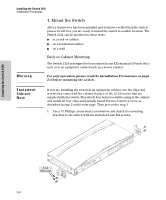
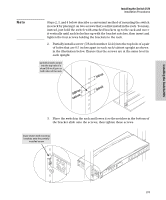
Installing the Switch 2124 Tr a n s c e i v e r Notes Installing the Switch 2124 Installation Procedures 2. Install An Optional Transceiver Install an optional HP 100-FX SC Transceiver into the transceiver slot as shown in the illustration below, or by following the instructions in the manual that comes with the transceiver. The slot cover can be removed with either a flat-bladed or Torx T-10 screwdriver. Retain the slot cover for future use. I Install only the HP J4853A 100-FX SC Transceiver into the transceiver slot in the Switch 2124. I Make sure the transceiver is fully installed and that you screw in the retaining screws to secure the transceiver in place. I If you do not install a transceiver in the slot, make sure that the slot cover plate is still attached over the slot for safe operation and proper switch cooling. I In the Switch 2124, the transceiver can operate only at full duplex. Half duplex operation is not supported. Installing a Transceiver 1. Unplug the AC power from the switch. 2. Insert the transceiver into the guides and slide it in until it stops. 3. Press in firmly until the transceiver is flush with the face of the switch. 4. Tighten the retaining screws on the transceiver until they are secure, but do not overtighten them. 5. Plug the AC power back into the switch to reboot the switch and initialize the transceiver. Supported Transceiver Model: Install only the HP J4853A 100-FX SC Transceiver into the transceiver slot. 2-5
-
 1
1 -
2
-
3
-
4
-
5
-
6
-
7
-
8
-
9
-
10
-
11
-
12
-
13
-
 14
14 -
 15
15 -
 16
16 -
 17
17 -
 18
18 -
 19
19 -
 20
20 -
 21
21 -
 22
22 -
 23
23 -
 24
24 -
25
-
26
-
27
-
28
-
29
-
30
-
31
-
32
-
33
-
34
-
35
-
36
-
37
-
38
-
39
-
40
-
41
-
42
-
43
-
44
-
45
-
46
-
47
-
48
-
49
-
50
-
51
-
52
-
53
-
54
-
55
-
56
-
57
-
58
-
59
-
60
 |
 |