HP J4868A User Manual - Page 5
Contents, Introducing the HP Procurve Switch 2124, Installing the Switch 2124 - parts
 |
View all HP J4868A manuals
Add to My Manuals
Save this manual to your list of manuals |
Page 5 highlights
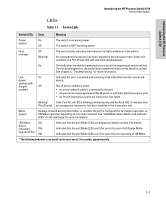
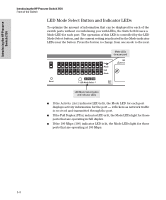
Contents 1 Introducing the HP Procurve Switch 2124 Front of the Switch 1-2 Network Ports 1-2 Reset Button 1-2 LEDs 1-3 LED Mode Select Button and Indicator LEDs 1-4 Back of the Switch 1-5 Power Connector 1-5 Features 1-6 Switch Operation Overview 1-6 Address Table Operation 1-6 2 Installing the Switch 2124 Included Parts 2-1 Installation Procedures 2-2 Summary 2-2 Installation Precautions 2-3 1. Prepare the Installation Site 2-4 2. Install An Optional Transceiver 2-5 3. Verify the Switch Operates Correctly 2-6 4. Mount the Switch 2-8 5. Connect the Switch to a Power Source 2-12 6. Connect the Network Cables 2-13 Example Network Topologies 2-14 As a Desktop Switch 2-14 As a Segment Switch 2-15 Connecting to a Backbone Switch 2-16 iii
-
 1
1 -
 2
2 -
 3
3 -
 4
4 -
 5
5 -
 6
6 -
 7
7 -
 8
8 -
 9
9 -
 10
10 -
 11
11 -
12
-
13
-
14
-
15
-
16
-
17
-
18
-
19
-
20
-
21
-
22
-
23
-
24
-
25
-
26
-
27
-
28
-
29
-
30
-
31
-
32
-
33
-
34
-
35
-
36
-
37
-
38
-
39
-
40
-
41
-
42
-
43
-
44
-
45
-
46
-
47
-
48
-
49
-
50
-
51
-
52
-
53
-
54
-
55
-
56
-
57
-
58
-
59
-
60
 |
 |

iii
Contents
1
Introducing the HP Procurve Switch 2124
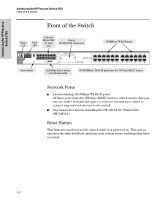
Front of the Switch
. . . . . . . . . . . . . . . . . . . . . . . . . . . . . . . . . . . . . . . . . . . . 1-2
Network Ports
. . . . . . . . . . . . . . . . . . . . . . . . . . . . . . . . . . . . . . . . . . . . . . 1-2
Reset Button
. . . . . . . . . . . . . . . . . . . . . . . . . . . . . . . . . . . . . . . . . . . . . . . 1-2
LEDs
. . . . . . . . . . . . . . . . . . . . . . . . . . . . . . . . . . . . . . . . . . . . . . . . . . . . . . 1-3
LED Mode Select Button and Indicator LEDs . . . . . . . . . . . . . . . . . . . . 1-4
Back of the Switch
. . . . . . . . . . . . . . . . . . . . . . . . . . . . . . . . . . . . . . . . . . . . 1-5
Power Connector
. . . . . . . . . . . . . . . . . . . . . . . . . . . . . . . . . . . . . . . . . . . 1-5
Features
. . . . . . . . . . . . . . . . . . . . . . . . . . . . . . . . . . . . . . . . . . . . . . . . . . . . . . 1-6
Switch Operation Overview
. . . . . . . . . . . . . . . . . . . . . . . . . . . . . . . . . . . . 1-6
Address Table Operation
. . . . . . . . . . . . . . . . . . . . . . . . . . . . . . . . . . . . . 1-6
2
Installing the Switch 2124
Included Parts
. . . . . . . . . . . . . . . . . . . . . . . . . . . . . . . . . . . . . . . . . . . . . . . . 2-1
Installation Procedures
. . . . . . . . . . . . . . . . . . . . . . . . . . . . . . . . . . . . . . . . 2-2
Summary . . . . . . . . . . . . . . . . . . . . . . . . . . . . . . . . . . . . . . . . . . . . . . . . . . . 2-2
Installation Precautions: . . . . . . . . . . . . . . . . . . . . . . . . . . . . . . . . . . . . . . 2-3
1. Prepare the Installation Site
. . . . . . . . . . . . . . . . . . . . . . . . . . . . . . . . 2-4
2. Install An Optional Transceiver . . . . . . . . . . . . . . . . . . . . . . . . . . . . . . 2-5
3. Verify the Switch Operates Correctly . . . . . . . . . . . . . . . . . . . . . . . . . 2-6
4. Mount the Switch
. . . . . . . . . . . . . . . . . . . . . . . . . . . . . . . . . . . . . . . . . 2-8
5. Connect the Switch to a Power Source
. . . . . . . . . . . . . . . . . . . . . . 2-12
6. Connect the Network Cables . . . . . . . . . . . . . . . . . . . . . . . . . . . . . . . 2-13
Example Network Topologies
. . . . . . . . . . . . . . . . . . . . . . . . . . . . . . . . . 2-14
As a Desktop Switch . . . . . . . . . . . . . . . . . . . . . . . . . . . . . . . . . . . . . . . . 2-14
As a Segment Switch . . . . . . . . . . . . . . . . . . . . . . . . . . . . . . . . . . . . . . . . 2-15
Connecting to a Backbone Switch
. . . . . . . . . . . . . . . . . . . . . . . . . . . . 2-16