HP J5780 User Guide - Macintosh - Page 55
Create a phone book entry, Edit or delete a phone book entry, Export and import fax numbers
 |
UPC - 882780940253
View all HP J5780 manuals
Add to My Manuals
Save this manual to your list of manuals |
Page 55 highlights
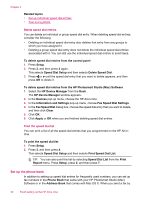
using the HP Photosmart Studio (Mac) Software, you can simply select an entry from the Phone Book or Address Book and the contact information is automatically inserted. HP recommends using the Address Book to store your fax recipients' information, rather than the Phone Book. For information on adding recipients to the Address Book, see the onscreen Help that came with Mac OS X. NOTE: The Phone Book and Address Book are only available when sending a fax from the HP Photosmart Studio (Mac) Software. Speed dial entries are available when sending a fax from both the HP Photosmart Studio (Mac) Software and the control panel of the HP All-in-One. This section contains the following topics: • Create a phone book entry • Edit or delete a phone book entry • Export and import fax numbers Create a phone book entry Follow these steps to add an entry to the phone book. To create a phone book entry from the HP Photosmart Studio (Mac) Software 1. Select the HP Device Manager from the Dock. The HP Device Manager window appears. 2. From the Information and Settings drop-down, select Fax Speed Dial Settings. 3. From the pop-up menu, choose Fax Phone Book. The Fax Phone Book dialog box opens. 4. Click Add Individual, and then enter the fax number and other recipient information. 5. Click OK. The recipient is added to the Phone Book. Edit or delete a phone book entry Follow these steps to edit or delete an entry from the phone book. To edit or delete a phone book entry from the HP Photosmart Studio (Mac) Software 1. Select the HP Device Manager from the Dock. The HP Device Manager window appears. 2. From the Information and Settings drop-down, select Fax Speed Dial Settings. 3. From the pop-up menu, choose Fax Phone Book. The Fax Phone Book dialog box opens. 4. Select the phone book entry you want to edit or delete. • To edit the phone book entry, click Edit Entry, and then make the appropriate changes. Click OK. • To delete the phone book entry, click Delete, and then click OK. 5. Click Apply or OK. Export and import fax numbers If you would like to share your phone book with someone else, you can simply export it to a file, which can then be imported into another application. If you have names and fax Fax setup 53
-
 1
1 -
2
-
3
-
4
-
5
-
6
-
7
-
8
-
9
-
10
-
11
-
12
-
13
-
14
-
15
-
16
-
17
-
18
-
19
-
20
-
21
-
22
-
23
-
24
-
25
-
26
-
27
-
28
-
29
-
30
-
31
-
32
-
33
-
34
-
35
-
36
-
37
-
38
-
39
-
40
-
41
-
42
-
43
-
44
-
45
-
46
-
47
-
48
-
49
-
 50
50 -
 51
51 -
 52
52 -
 53
53 -
 54
54 -
 55
55 -
 56
56 -
 57
57 -
 58
58 -
 59
59 -
 60
60 -
61
-
62
-
63
-
64
-
65
-
66
-
67
-
68
-
69
-
70
-
71
-
72
-
73
-
74
-
75
-
76
-
77
-
78
-
79
-
80
-
81
-
82
-
83
-
84
-
85
-
86
-
87
-
88
-
89
-
90
-
91
-
92
-
93
-
94
-
95
-
96
-
97
-
98
-
99
-
100
-
101
-
102
-
103
-
104
-
105
-
106
-
107
-
108
-
109
-
110
-
111
-
112
-
113
-
114
-
115
-
116
-
117
-
118
-
119
-
120
-
121
-
122
-
123
-
124
-
125
-
126
-
127
-
128
-
129
-
130
-
131
-
132
-
133
-
134
-
135
-
136
-
137
-
138
-
139
-
140
-
141
-
142
-
143
-
144
-
145
-
146
-
147
-
148
-
149
-
150
-
151
-
152
-
153
-
154
-
155
-
156
-
157
-
158
-
159
-
160
-
161
-
162
-
163
-
164
-
165
-
166
-
167
-
168
-
169
-
170
-
171
-
172
-
173
-
174
-
175
-
176
-
177
-
178
-
179
-
180
-
181
-
182
-
183
-
184
-
185
-
186
-
187
-
188
-
189
-
190
-
191
-
192
-
193
-
194
-
195
-
196
-
197
-
198
-
199
-
200
-
201
-
202
-
203
-
204
-
205
-
206
-
207
-
208
-
209
-
210
-
211
-
212
-
213
-
214
-
215
-
216
-
217
-
218
-
219
-
220
-
221
-
222
-
223
-
224
-
225
-
226
-
227
-
228
-
229
-
230
-
231
-
232
-
233
-
234
-
235
-
236
-
237
-
238
-
239
-
240
-
241
-
242
-
243
-
244
-
245
-
246
-
247
-
248
-
249
-
250
-
251
-
252
-
253
-
254
-
255
-
256
-
257
-
258
-
259
-
260
-
261
-
262
-
263
-
264
-
265
-
266
-
267
-
268
-
269
-
270
-
271
-
272
-
273
-
274
-
275
-
276
-
277
-
278
-
279
-
280
-
281
-
282
-
283
-
284
-
285
-
286
-
287
-
288
-
289
-
290
-
291
-
292
-
293
-
294
-
295
-
296
 |
 |
