HP Kayak XW U3-W3 HP Kayak XA-s Series 02xx, Main Parts Replacement Instructio
HP Kayak XW U3-W3 Manual
 |
View all HP Kayak XW U3-W3 manuals
Add to My Manuals
Save this manual to your list of manuals |
HP Kayak XW U3-W3 manual content summary:
- HP Kayak XW U3-W3 | HP Kayak XA-s Series 02xx, Main Parts Replacement Instructio - Page 1
HP Kayak XA-s Series 02xx, XU Series 03xx, XW Series U3 & W3 Main Part Replacement Instructions Instructions los pasos Upper Ultraflow Airflow Guide Steps 1 - 7 service part. To equalize the static electricity, rest the service part bag on top of the computer while you are removing the service - HP Kayak XW U3-W3 | HP Kayak XA-s Series 02xx, Main Parts Replacement Instructio - Page 2
simple, si vous pensez ne pas être en mesure de le faire vous-même, contactez votre distributeur local ou un agent HP pour acquérir un service de réparation. AVERTISSEMENT COMME AVEC TOUT EQUIPEMENT ELECTRIQUE, UNE MAUVAISE MANIPULATION PEUT ETRE A L'ORIGINE D'UN ACCIDENT OU ENTRAINER LA MORT. SOYEZ - HP Kayak XW U3-W3 | HP Kayak XA-s Series 02xx, Main Parts Replacement Instructio - Page 3
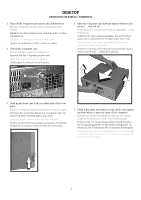
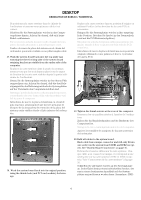
DESKTOP ORDINATEUR DE BUREAU / SOBREMESA 1. Turn off the computer and remove all cables from it. Mettez l'ordinateur hors tension et débranchez les câbles. Schalten Sie den Computer aus, und ziehen Sie von ihm alle Kabel ab. - HP Kayak XW U3-W3 | HP Kayak XA-s Series 02xx, Main Parts Replacement Instructio - Page 4
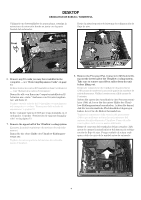
di espansione" a pagina 13. Retire cualquier tarjeta de E/S que tenga instalada en el ordenador. Consulte "Sustitución de tarjetas deampliación" en la página 13. 7. Remove the upper half of the Ultraflow cooling system. Extrayez la moitié supérieure du système de refroidissement. Bauen Sie die obere - HP Kayak XW U3-W3 | HP Kayak XA-s Series 02xx, Main Parts Replacement Instructio - Page 5
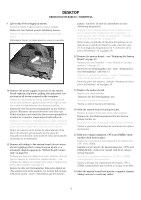
todos los conectores de todas las unidades montadas en el ordenador. 11. Remove all cabling to the system board (do not worry about forgetting which ático en "Conectores de la placa del sistema" en la página 16). 12. Remove the system board - see "Replacing the System Board" on page 13. Extrayez la - HP Kayak XW U3-W3 | HP Kayak XA-s Series 02xx, Main Parts Replacement Instructio - Page 6
no pillar ningún cable. 17. Work the system board back into the top guide rail, ensuring the three locking tabs of the system board retaining bracket are the under side of the computer. Replacez la carte système dans le guide de montage, assurez-vous que les trois loquets placés sur le taquet - HP Kayak XW U3-W3 | HP Kayak XA-s Series 02xx, Main Parts Replacement Instructio - Page 7
system, taking care to place any ribbon cables between the clear plastic guides, and remembering to refit the fan connector. Insérez la partie inf necessary drives, • the power supply unit, • the upper Ultraflow cooling system guide. It will click into place, • all expansion cards, • the computer - HP Kayak XW U3-W3 | HP Kayak XA-s Series 02xx, Main Parts Replacement Instructio - Page 8
le côté. Legen Sie den Computer auf dessen Seite. Appoggiare il computer su un fianco. Ponga el ordenador sobre un lado. 5. Remove the clear plastic shield. Retirez la protection en plastique. Entfernen Sie die transparente Kunststoffabschirmung. Togliere lo schermo di plastica trasparente. Retire - HP Kayak XW U3-W3 | HP Kayak XA-s Series 02xx, Main Parts Replacement Instructio - Page 9
pagina 13. Retire cualquier tarjeta de ampliación que tenga instalada en el ordenador. Consulte "Sustitución de tarjetas deampliación" en la página 13. 7. Remove the upper half of the Ultraflow cooling system. Extrayez la moitié supérieure du système de refroidissement Ultraflow. Bauen Sie die obere - HP Kayak XW U3-W3 | HP Kayak XA-s Series 02xx, Main Parts Replacement Instructio - Page 10
retirar cualquier cable de cinta de la unidad antes de extraerlo. 12. Remove all cabling to the system board (do not worry about forgetting which ático en "Conectores de la placa del sistema" en la página 16). 13. Remove the system board - see "Replacing the System Board" on page 13. Extrayez la - HP Kayak XW U3-W3 | HP Kayak XA-s Series 02xx, Main Parts Replacement Instructio - Page 11
three locking tabs of the system board retaining bracket are visible from the under side of the computer. Replacez la carte système dans le guide de montage, assurez-vous que les trois loquets placés sur le taquet de fixation de la carte sont visibles depuis la partie inférieure de - HP Kayak XW U3-W3 | HP Kayak XA-s Series 02xx, Main Parts Replacement Instructio - Page 12
system, taking care to place any ribbon cables between the clear plastic guides, and remembering to refit the fan connector. Insérez la partie inf necessary drives, • the power supply unit, • the upper Ultraflow cooling system guide. It will click into place, • all expansion cards, • the computer - HP Kayak XW U3-W3 | HP Kayak XA-s Series 02xx, Main Parts Replacement Instructio - Page 13
Rimozione delle schede di espansione Sustitución de tarjetas deampliación 1. Remove any cables from the IO card. Débranchez tous les câbles la placa del sistema 1. Press in the two system board guide tabs (towards each end of the guide) to release the system board. Libérez la carte systè - HP Kayak XW U3-W3 | HP Kayak XA-s Series 02xx, Main Parts Replacement Instructio - Page 14
del ordenador, asegurándose de que no pilla ningún cable de los distintos componentes de la placa del sistema. Desktop Retire cualquier regulador de tensión. ƒ ‚ ‚ 6. Remove any CPUs. Retirez toutes les CPU. Bauen Sie die CPU(s) aus. Togliere tutte le CPU. Retire cualquier CPU. ‚ ƒ ‚ Minitower - HP Kayak XW U3-W3 | HP Kayak XA-s Series 02xx, Main Parts Replacement Instructio - Page 15
diagrama esquemático siguiente. 9. On the replacement system board, ensure that all system board switches (SW1) match those of the board you have removed. Assurez-vous que tous les commutateurs (SW1) de la nouvelle carte système sont identiques à ceux de l'ancienne carte. Vergewissern Sie sich, da - HP Kayak XW U3-W3 | HP Kayak XA-s Series 02xx, Main Parts Replacement Instructio - Page 16
Sie sich die aktuellste BIOS-Version unter der folgenden Adresse herunter: Scaricare il BIOS più recente da: Descargue el último BIOS de: http://www.hp.com/go/kayaksupport 2. Run the executable file you have downloaded. When prompted, enter the serial number for your PC (see rear of PC). Lancez
-
 1
1 -
 2
2 -
 3
3 -
 4
4 -
 5
5 -
 6
6 -
 7
7 -
8
-
9
-
10
-
11
-
12
-
13
-
14
-
15
-
16
 |
 |
1
Main Part Replacement Instructions
Instructions de remplacement des pièces principales
Austauschanweisungen für wichtige Teile
Sostituzione dei principali componenti
Instrucciones de sustitución de piezas principales
HP Kayak
XA-s Series 02xx,
XU Series 03xx,
XW Series U3 & W3
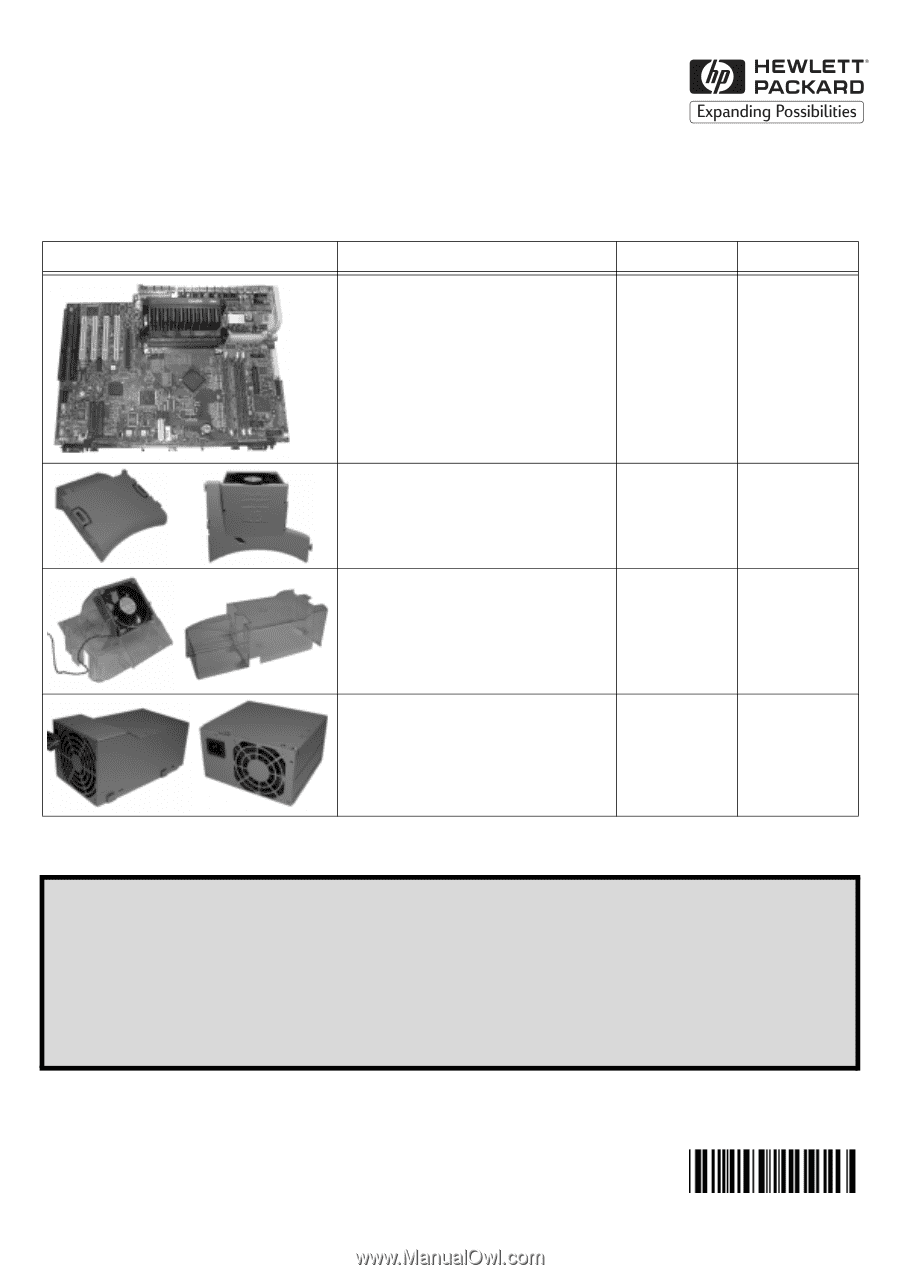
Part
Description
Desktop
Minitower
System Board
Carte système
Systemplatine
Scheda di sistema
Placa del sistema
All steps
Toutes les étapes
Alle Schritte
Tutti i punti
Todos los pasos
All steps
Toutes les étapes
Alle Schritte
Tutti i punti
Todos los pasos
Upper Ultraflow Airflow Guide
Conduit de ventilation Ultraflow supérieur
Oberer Ultraflow-Lüftungskanal
Guida di aerazione Ultraflow superiore
Guía de flujo de aire superior
Steps 1 - 7
Steps 1 - 8
Lower Ultraflow Airflow Guide
Conduit de ventilation Ultraflow inférieur
Unterer Ultraflow-Lüftungskanal
Guida di aerazione Ultraflow inferiore
Guía de flujo de aire inferior
Steps 1 - 8
Steps 1 - 12
Power Supply
Unité d’alimentation
Netzteil
Alimentatore
Fuente de alimentación
Steps 1 - 10
Steps 1 - 11
Safety Information
UNPLUG ALL POWER CONNECTIONS TO THE COMPUTER BEFORE ATTEMPTING TO FIT THIS PART.
While replacement of this part is fairly straightforward, if you do not feel comfortable replacing it yourself, please contact your local dealer or HP representative to purchase repair
services.
WARNING
AS WITH ANY ELECTRICAL EQUIPMENT IMPROPER HANDLING CAN CAUSE SEVERE PERSONAL INJURY OR DEATH. CAUTION SHOULD BE USED WHEN WORKING WITH THIS
EQUIPMENT.
Caution — Electrostatic Discharges
Static electricity can damage electronic components. Don’t let your clothes touch the service part. To equalize the static electricity, rest the service part bag on top of the computer while
you are removing the service part from the bag.
Part No.
5967-9535