HP LH4r HP Netserver LH 3 NetRAID-3Si Installation Guide - Page 77
Power Up Shared Storage, Create the Arrays, Set RAID Levels on a Cluster
 |
View all HP LH4r manuals
Add to My Manuals
Save this manual to your list of manuals |
Page 77 highlights
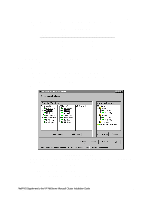
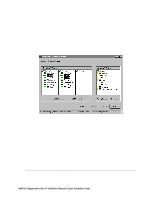
Power Up Shared Storage Turn on power for the HP shared storage cabinet(s). Create the Arrays CAUTION From this point forward and until Microsoft Cluster Server Software is fully installed after part "7 Microsoft Cluster Server Software Setup" in the Installation Guide, make sure that only one HP NetServer is running Windows NT 4.0 at a time. The other system must be held at the NT loader prompt. (Hold the NetServer at the NT loader prompt by pressing Esc during reboot when prompted to select the operating system.) Define RAID Arrays Check that no CDs or floppy disks are in System A drives. 1. Power on System B and hold it at the NT loader prompt by pressing Esc during reboot when prompted to select the operating system. Use the following steps to create and initialize the shared logical disks on System A. 2. Setup your RAID arrays using RAID level 1, 5, 10 and/or 50.. See "Set RAID Levels on a Cluster" below for examples of how to setup RAID levels. Refer to the HP NetRAID User Guide in HP Information Assistant for detailed information about HP NetRAID configuration issues. NOTE Make sure each RAID array's cache write policy is set to Write Thru. Using a "Write Back" cache policy for shared storage can cause an application to read stale data from storage after a failover. Cache write policy is set when the RAID array is being defined in the NetRAID Assistant configuration wizard at the logical drive definition pane by pressing the Advanced button. If you do not set the cache write policy to Write Thru, the NetRAID Assistant will not configure the array. After setting RAID levels as stated below return to "Create the Array File Systems" in part "6 Shared Storage Software Setup" of the Installation Guide. Set RAID Levels on a Cluster Use these instructions to set up HP NetServer cluster RAID level 1, 5, 10, or 50, or any combination of these levels. Refer to the Configuration Guide for your cluster configuration for allowable RAID levels. See part "1 What's Needed" in the Installation Guide. Getting Started NOTE If not already done, partially boot System B and hold it at the NT loader prompt by pressing Esc during reboot when prompted to select the Operating System. Boot System A to NT. NetRAID Supplement to the HP NetServer Microsoft Cluster Installation Guide 18
-
 1
1 -
2
-
3
-
4
-
5
-
6
-
7
-
8
-
9
-
10
-
11
-
12
-
13
-
14
-
15
-
16
-
17
-
18
-
19
-
20
-
21
-
22
-
23
-
24
-
25
-
26
-
27
-
28
-
29
-
30
-
31
-
32
-
33
-
34
-
35
-
36
-
37
-
38
-
39
-
40
-
41
-
42
-
43
-
44
-
45
-
46
-
47
-
48
-
49
-
50
-
51
-
52
-
53
-
54
-
55
-
56
-
57
-
58
-
59
-
60
-
61
-
62
-
63
-
64
-
65
-
66
-
67
-
68
-
69
-
70
-
71
-
 72
72 -
 73
73 -
 74
74 -
 75
75 -
 76
76 -
 77
77 -
 78
78 -
 79
79 -
 80
80 -
 81
81 -
 82
82
 |
 |