HP LH4r HP Netserver LH 3 Surestore E Installation Guide - Page 64
Step 1. Set the Controller SCSI ID, Step 2. Enable SCSI Settings SDTR and WDTR, Step 3. Create
 |
View all HP LH4r manuals
Add to My Manuals
Save this manual to your list of manuals |
Page 64 highlights
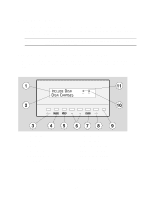
Step 1. Set the Controller SCSI ID NOTE If two controllers are connected to the same SCSI bus, they must each have unique SCSI IDs. SCSI ID 7 is reserved for use by the SCSI HBA. 1. Press Menu 2. Press + until Cntrl Changes appears in the display, then press Enter. 3. Press + until SCSI ID appears in the display, then press Enter. 4. Press + until For Cntrl X appears, then press Enter 5. Press + to select the desired SCSI ID, then press Enter. 6. When prompted to Reset OK?, press Enter . 7. When prompted to Confirm, press Enter. 8. Repeat this procedure selecting For Cntrl Y in step 4. Step 2. Enable SCSI Settings SDTR and WDTR The SCSI settings SDTR (Synchronous Data Transfer Request) and WDTR (Wide Data Transfer Request) must be enabled for proper operation. These settings control the transfer of data over the SCSI bus. 1. Press Menu 2. Press + until Cntrl Changes appears in the display, then press Enter. 3. Press + until SDTR appears, then press Enter. 4. Press + until Enable appears, then press Enter. 5. When prompted to Confirm, press Enter. 6. Repeat the above steps, selecting WDTR in step 4. Step 3. Create a Logical Drive A single logical drive must be created on the disk array before the operating system can communicate with the disk array. This logical drive must be reserved for exclusive use by the SureStore E Manager software and cannot be used for user data. 1. Press Menu 2. Press + until Logical Drv Changes appears in the display, then press Enter. 3. Press + until Create L-Drv appears in the display, then press Enter. 4. Select the default drive number 0, then press Enter. 5. Set the capacity size to the default of 100 MB (megabytes), then press Enter. 6. When prompted to Confirm, press Enter. NOTE Make sure you leave the disk array power on after completing these steps. To part 3 of the HP NetServer Microsoft Cluster Installation Guide 14
-
 1
1 -
2
-
3
-
4
-
5
-
6
-
7
-
8
-
9
-
10
-
11
-
12
-
13
-
14
-
15
-
16
-
17
-
18
-
19
-
20
-
21
-
22
-
23
-
24
-
25
-
26
-
27
-
28
-
29
-
30
-
31
-
32
-
33
-
34
-
35
-
36
-
37
-
38
-
39
-
40
-
41
-
42
-
43
-
44
-
45
-
46
-
47
-
48
-
49
-
50
-
51
-
52
-
53
-
54
-
55
-
56
-
57
-
58
-
 59
59 -
 60
60 -
 61
61 -
 62
62 -
 63
63 -
 64
64 -
 65
65 -
 66
66 -
 67
67 -
 68
68 -
 69
69 -
70
 |
 |
