HP LH4r HP Netserver LH 3 Surestore E Installation Guide - Page 69
Set Up SureStore Manager
 |
View all HP LH4r manuals
Add to My Manuals
Save this manual to your list of manuals |
Page 69 highlights
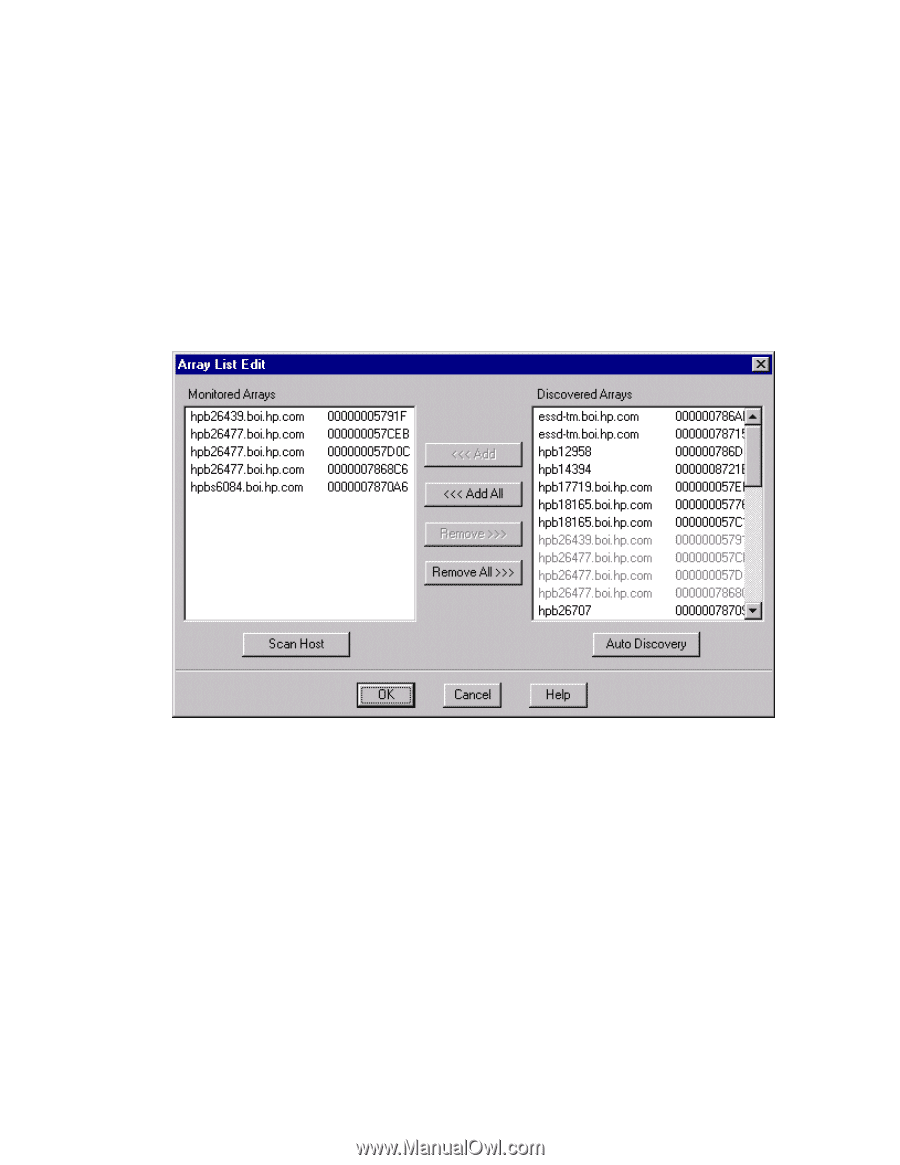
Set Up SureStore Manager After installing the software, a few steps must be performed before you can begin managing the disk arrays. This involves adding the disk arrays in the cluster to the Array List. 1. From the Start menu, select Programs|SureStore Manager|SureStore Manager. SureStore Manager begins looking for all SureStore E 12H disk arrays connected to the cluster. As disk arrays are identified, they are added to the Discovered Arrays in the Array List Edit dialog box. If both cluster servers are operating, each SureStore E 12H on your cluster will be displayed twice in the Discovered Arrays box - once for each server. Any other SureStore E 12H disk arrays detected on the local network will also be displayed. 2. Select the disk array you want to manage from the Discovered Arrays. You can select multiple arrays at once. 3. Click the
-
 1
1 -
2
-
3
-
4
-
5
-
6
-
7
-
8
-
9
-
10
-
11
-
12
-
13
-
14
-
15
-
16
-
17
-
18
-
19
-
20
-
21
-
22
-
23
-
24
-
25
-
26
-
27
-
28
-
29
-
30
-
31
-
32
-
33
-
34
-
35
-
36
-
37
-
38
-
39
-
40
-
41
-
42
-
43
-
44
-
45
-
46
-
47
-
48
-
49
-
50
-
51
-
52
-
53
-
54
-
55
-
56
-
57
-
58
-
59
-
60
-
61
-
62
-
63
-
 64
64 -
 65
65 -
 66
66 -
 67
67 -
 68
68 -
 69
69 -
 70
70
 |
 |