HP LaserJet 9000 Service Manual - Page 171
Rollers pickup, feed, and separation,
 |
View all HP LaserJet 9000 manuals
Add to My Manuals
Save this manual to your list of manuals |
Page 171 highlights
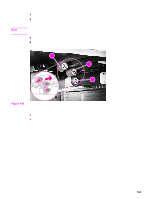
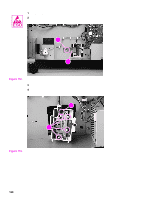
Note Rollers (pickup, feed, and separation) 1 Remove tray 4. See page 154. 2 Locate the appropriate roller on the upper right side of the tray cavity. The pickup roller (callout 1), feed roller (callout 2), and separation roller (callout 3) are all type 2 rollers. To gain access to the separation roller, slide the blue roller shield toward the back of tray 4 (as shown in figure 105). 3 Pinch the tab on the end of each roller to release it. 4 Slide the roller off of the shaft. 12 2 32 Figure 105. Rollers To reinstall z You do not need to slide the blue shield back over the separation roller. It will reset automatically. z Make sure that each roller is locked in place by attempting to remove it without first pinching the tab. Tray 4 155
-
 1
1 -
2
-
3
-
4
-
5
-
6
-
7
-
8
-
9
-
10
-
11
-
12
-
13
-
14
-
15
-
16
-
17
-
18
-
19
-
20
-
21
-
22
-
23
-
24
-
25
-
26
-
27
-
28
-
29
-
30
-
31
-
32
-
33
-
34
-
35
-
36
-
37
-
38
-
39
-
40
-
41
-
42
-
43
-
44
-
45
-
46
-
47
-
48
-
49
-
50
-
51
-
52
-
53
-
54
-
55
-
56
-
57
-
58
-
59
-
60
-
61
-
62
-
63
-
64
-
65
-
66
-
67
-
68
-
69
-
70
-
71
-
72
-
73
-
74
-
75
-
76
-
77
-
78
-
79
-
80
-
81
-
82
-
83
-
84
-
85
-
86
-
87
-
88
-
89
-
90
-
91
-
92
-
93
-
94
-
95
-
96
-
97
-
98
-
99
-
100
-
101
-
102
-
103
-
104
-
105
-
106
-
107
-
108
-
109
-
110
-
111
-
112
-
113
-
114
-
115
-
116
-
117
-
118
-
119
-
120
-
121
-
122
-
123
-
124
-
125
-
126
-
127
-
128
-
129
-
130
-
131
-
132
-
133
-
134
-
135
-
136
-
137
-
138
-
139
-
140
-
141
-
142
-
143
-
144
-
145
-
146
-
147
-
148
-
149
-
150
-
151
-
152
-
153
-
154
-
155
-
156
-
157
-
158
-
159
-
160
-
161
-
162
-
163
-
164
-
165
-
 166
166 -
 167
167 -
 168
168 -
 169
169 -
 170
170 -
 171
171 -
 172
172 -
 173
173 -
 174
174 -
 175
175 -
 176
176 -
177
-
178
-
179
-
180
-
181
-
182
-
183
-
184
-
185
-
186
-
187
-
188
-
189
-
190
-
191
-
192
-
193
-
194
-
195
-
196
-
197
-
198
-
199
-
200
-
201
-
202
-
203
-
204
-
205
-
206
-
207
-
208
-
209
-
210
-
211
-
212
-
213
-
214
-
215
-
216
-
217
-
218
-
219
-
220
-
221
-
222
-
223
-
224
-
225
-
226
-
227
-
228
-
229
-
230
-
231
-
232
-
233
-
234
-
235
-
236
-
237
-
238
-
239
-
240
-
241
-
242
-
243
-
244
-
245
-
246
-
247
-
248
-
249
-
250
-
251
-
252
-
253
-
254
-
255
-
256
-
257
-
258
-
259
-
260
-
261
-
262
-
263
-
264
-
265
-
266
-
267
-
268
-
269
-
270
-
271
-
272
-
273
-
274
-
275
-
276
-
277
-
278
-
279
-
280
-
281
-
282
-
283
-
284
-
285
-
286
-
287
-
288
-
289
-
290
-
291
-
292
-
293
-
294
-
295
-
296
-
297
-
298
-
299
-
300
-
301
-
302
-
303
-
304
-
305
-
306
-
307
-
308
-
309
-
310
-
311
-
312
-
313
-
314
-
315
-
316
-
317
-
318
-
319
-
320
-
321
-
322
-
323
-
324
-
325
-
326
-
327
-
328
-
329
-
330
-
331
-
332
 |
 |

Tray 4
155
Rollers (pickup, feed, and separation)
1
Remove tray 4. See page 154.
2
Locate the appropriate roller on the upper right side of the tray cavity. The pickup roller
(callout 1), feed roller (callout 2), and separation roller (callout 3) are all type 2 rollers.
Note
To gain access to the separation roller, slide the blue roller shield toward the back of tray 4 (as shown
in figure 105).
3
Pinch the tab on the end of each roller to release it.
4
Slide the roller off of the shaft.
Figure 105.
Rollers
To reinstall
You do not need to slide the blue shield back over the separation roller. It will reset automatically.
Make sure that each roller is locked in place by attempting to remove it without first pinching the
tab.
2
2
2
1
3
2