HP LaserJet Enterprise M806 User Guide 1 - Page 70
Product return, and recycling, Administration, Stapler/Stacker Settings, Hole Punching
 |
View all HP LaserJet Enterprise M806 manuals
Add to My Manuals
Save this manual to your list of manuals |
Page 70 highlights
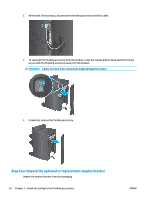
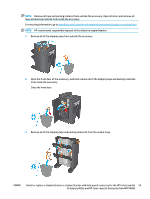
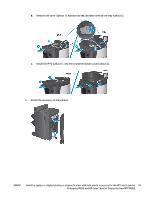
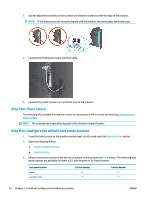
3. Use the adjustment wheels on the accessory to align the accessory with the edge of the product. NOTE: If the accessory is not correctly aligned with the product, excessive paper jams may occur. 4. Connect the finishing accessory interface cable. 5. Connect the product power cord, and then turn on the product. Step four: Parts return The following URL provides information on how to return parts to HP for reuse and recycling: Product return and recycling NOTE: HP recommends responsible disposal of the defective stapler/stacker. Step five: Configure the default hole punch location 1. From the Home screen on the product control panel, scroll to and touch the Administration button. 2. Open the following menus: ● Stapler/Stacker Settings ● Hole Punching 3. Select a hole punch location from the list of options, and then touch the Save button. The following hole punch options are available for either a 2/3 Hole Puncher or 2/4 Hole Puncher: Hole punch location None Two left or top 2/3 Hole Puncher 2/4 Hole Puncher 62 Chapter 2 Install and configure the finishing accessories ENWW
-
 1
1 -
2
-
3
-
4
-
5
-
6
-
7
-
8
-
9
-
10
-
11
-
12
-
13
-
14
-
15
-
16
-
17
-
18
-
19
-
20
-
21
-
22
-
23
-
24
-
25
-
26
-
27
-
28
-
29
-
30
-
31
-
32
-
33
-
34
-
35
-
36
-
37
-
38
-
39
-
40
-
41
-
42
-
43
-
44
-
45
-
46
-
47
-
48
-
49
-
50
-
51
-
52
-
53
-
54
-
55
-
56
-
57
-
58
-
59
-
60
-
61
-
62
-
63
-
64
-
 65
65 -
 66
66 -
 67
67 -
 68
68 -
 69
69 -
 70
70 -
 71
71 -
 72
72 -
 73
73 -
 74
74 -
 75
75 -
76
-
77
-
78
-
79
-
80
-
81
-
82
-
83
-
84
-
85
-
86
-
87
-
88
-
89
-
90
-
91
-
92
-
93
-
94
-
95
-
96
-
97
-
98
-
99
-
100
-
101
-
102
-
103
-
104
-
105
-
106
-
107
-
108
-
109
-
110
-
111
-
112
-
113
-
114
-
115
-
116
-
117
-
118
-
119
-
120
-
121
-
122
-
123
-
124
-
125
-
126
-
127
-
128
-
129
-
130
-
131
-
132
-
133
-
134
-
135
-
136
-
137
-
138
-
139
-
140
-
141
-
142
-
143
-
144
-
145
-
146
-
147
-
148
-
149
-
150
-
151
-
152
-
153
-
154
-
155
-
156
-
157
-
158
-
159
-
160
-
161
-
162
 |
 |
