HP N6350 HP Scanjet N6350 User Guide - Page 21
Con and manage the scanner on a network, Connect the scanner to a network - scanjet networked
 |
UPC - 884420551898
View all HP N6350 manuals
Add to My Manuals
Save this manual to your list of manuals |
Page 21 highlights
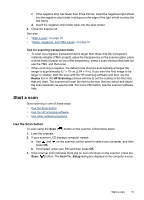
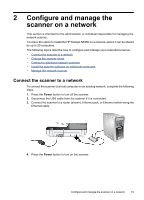
2 Configure and manage the scanner on a network This section is intended for the administrator or individual responsible for managing the network scanner. You have the option to install the HP Scanjet N6350 on a network, where it can be shared by up to 20 computers. The following topics describe how to configure and manage your networked scanner. • Connect the scanner to a network • Change the scanner name • Connect to additional network scanners • Install the scanner software on additional computers • Manage the network scanner Connect the scanner to a network To connect the scanner to a host computer on an existing network, complete the following steps. 1. Press the Power button to turn off the scanner. 2. Disconnect the USB cable from the scanner if it is connected. 3. Connect the scanner to a router (shown), Ethernet jack, or Ethernet switch using the Ethernet cable. 4. Press the Power button to turn on the scanner. Configure and manage the scanner on a network 19
-
 1
1 -
2
-
3
-
4
-
5
-
6
-
7
-
8
-
9
-
10
-
11
-
12
-
13
-
14
-
15
-
 16
16 -
 17
17 -
 18
18 -
 19
19 -
 20
20 -
 21
21 -
 22
22 -
 23
23 -
 24
24 -
 25
25 -
 26
26 -
27
-
28
-
29
-
30
-
31
-
32
-
33
-
34
-
35
-
36
-
37
-
38
-
39
-
40
-
41
-
42
-
43
-
44
-
45
-
46
-
47
-
48
-
49
-
50
-
51
-
52
-
53
-
54
-
55
-
56
-
57
-
58
-
59
-
60
 |
 |