HP OMEN 15-ax000 OMEN by Laptop PC Maintenance and Service Guide - Page 43
the internal clips. Lift the front edge, Slide a nylon
 |
View all HP OMEN 15-ax000 manuals
Add to My Manuals
Save this manual to your list of manuals |
Page 43 highlights
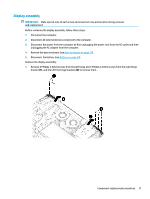
2. Remove the plastic plug and screw (1), and then remove the 2 Phillips M2x5.0 screws (2) and the 8 M2.5x6.0 screws (3). NOTE: There are three internal clips by the battery area. Carefully disengage those clips as you are removing the base enclosure. 3. Slide a nylon flake tool around the edge of the base enclosure to loosen it, taking care not to damage the internal clips. Lift the front edge (1) to access the internal clips in the battery area. 4. Remove the base enclosure (2). Reverse this procedure to replace the base enclosure. Component replacement procedures 33
-
 1
1 -
2
-
3
-
4
-
5
-
6
-
7
-
8
-
9
-
10
-
11
-
12
-
13
-
14
-
15
-
16
-
17
-
18
-
19
-
20
-
21
-
22
-
23
-
24
-
25
-
26
-
27
-
28
-
29
-
30
-
31
-
32
-
33
-
34
-
35
-
36
-
37
-
 38
38 -
 39
39 -
 40
40 -
 41
41 -
 42
42 -
 43
43 -
 44
44 -
 45
45 -
 46
46 -
 47
47 -
 48
48 -
49
-
50
-
51
-
52
-
53
-
54
-
55
-
56
-
57
-
58
-
59
-
60
-
61
-
62
-
63
-
64
-
65
-
66
-
67
-
68
-
69
-
70
-
71
-
72
-
73
-
74
-
75
-
76
-
77
-
78
-
79
-
80
-
81
-
82
-
83
-
84
-
85
-
86
-
87
-
88
-
89
-
90
-
91
-
92
-
93
-
94
-
95
-
96
 |
 |

2.
Remove the plastic plug and screw
(1)
, and then remove the 2 Phillips M2x5.0 screws
(2)
and the 8
M2.5x6.0 screws
(3)
.
NOTE:
There are three internal clips by the battery area. Carefully disengage those clips as you are
removing the base enclosure.
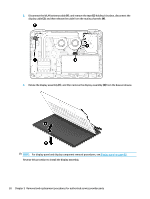
3.
Slide a nylon
flake
tool around the edge of the base enclosure to loosen it, taking care not to damage
the internal clips. Lift the front edge
(1)
to access the internal clips in the battery area.
4.
Remove the base enclosure
(2)
.
Reverse this procedure to replace the base enclosure.
Component replacement procedures
33