HP OMEN 15-ax000 OMEN by Laptop PC Maintenance and Service Guide - Page 70
Display panel
 |
View all HP OMEN 15-ax000 manuals
Add to My Manuals
Save this manual to your list of manuals |
Page 70 highlights
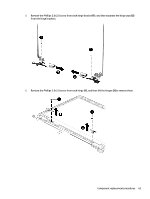
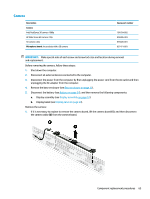
Display panel Description Bezel For products with an HD camera For products with a 3D camera Display panel 15.6" FHD AG UWVA 220 eDP, Slim 15.6" UHD AG UWVA 300 eDPU Slim 15.6" 1920x1080 AG UWVA 220 eDPU Slim (limited to China localization only) Hinge assembly Hinge cap assembly Display cable FHD display cable for products with an HD camera FHD display cable for products with a 3D camera UHD display cable for products with an HD camera UHD display cable for products with a 3D camera WLAN antenna Back cover In Hybrid Green finish, with antenna In Shadow Mesh finish, with antenna, for products with HD camera In Shadow Mesh finish, with antenna, for products with 3D camera Spare part number 856725-001 856726-001 752920-014 842484-004 915613-001 856741-001 859737-001 856733-001 856734-001 856735-001 856736-001 856923-001 905115-001 856715-001 856718-001 IMPORTANT: Make special note of each screw and screw lock size and location during removal and replacement. Before removing the display assembly, follow these steps: 1. Shut down the computer. 2. Disconnect all external devices connected to the computer. 3. Disconnect the power from the computer by first unplugging the power cord from the AC outlet and then unplugging the AC adapter from the computer. 4. Remove the base enclosure (see Base enclosure on page 32). 5. Disconnect the battery (see Battery on page 34), and then remove the following components: ▲ Display assembly (see Display assembly on page 37). Remove the display panel: 1. Use a thin plastic tool to disengage the bezel starting on the top edge (1). Continue on the left and right edges (2) and then bottom edge (3), and then lift the display bezel (4) to remove it. 60 Chapter 5 Removal and replacement procedures for authorized service provider parts
-
 1
1 -
2
-
3
-
4
-
5
-
6
-
7
-
8
-
9
-
10
-
11
-
12
-
13
-
14
-
15
-
16
-
17
-
18
-
19
-
20
-
21
-
22
-
23
-
24
-
25
-
26
-
27
-
28
-
29
-
30
-
31
-
32
-
33
-
34
-
35
-
36
-
37
-
38
-
39
-
40
-
41
-
42
-
43
-
44
-
45
-
46
-
47
-
48
-
49
-
50
-
51
-
52
-
53
-
54
-
55
-
56
-
57
-
58
-
59
-
60
-
61
-
62
-
63
-
64
-
 65
65 -
 66
66 -
 67
67 -
 68
68 -
 69
69 -
 70
70 -
 71
71 -
 72
72 -
 73
73 -
 74
74 -
 75
75 -
76
-
77
-
78
-
79
-
80
-
81
-
82
-
83
-
84
-
85
-
86
-
87
-
88
-
89
-
90
-
91
-
92
-
93
-
94
-
95
-
96
 |
 |
