HP OMEN 15-ax000 OMEN by Laptop PC Maintenance and Service Guide - Page 48
and then remove the display assembly, Rotate the display assembly
 |
View all HP OMEN 15-ax000 manuals
Add to My Manuals
Save this manual to your list of manuals |
Page 48 highlights
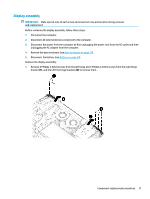
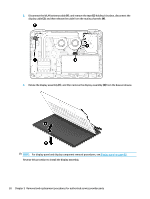
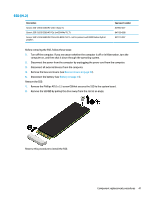
2. Disconnect the WLAN antenna cable (1), and remove the tape (2) holding it in place, disconnect the display cable (3), and then release the cable from the routing channels (4). 3. Rotate the display assembly (1), and then remove the display assembly (2) from the base enclosure. NOTE: For display panel and display component removal procedures, see Display panel on page 60. Reverse this procedure to install the display assembly. 38 Chapter 5 Removal and replacement procedures for authorized service provider parts
-
 1
1 -
2
-
3
-
4
-
5
-
6
-
7
-
8
-
9
-
10
-
11
-
12
-
13
-
14
-
15
-
16
-
17
-
18
-
19
-
20
-
21
-
22
-
23
-
24
-
25
-
26
-
27
-
28
-
29
-
30
-
31
-
32
-
33
-
34
-
35
-
36
-
37
-
38
-
39
-
40
-
41
-
42
-
 43
43 -
 44
44 -
 45
45 -
 46
46 -
 47
47 -
 48
48 -
 49
49 -
 50
50 -
 51
51 -
 52
52 -
 53
53 -
54
-
55
-
56
-
57
-
58
-
59
-
60
-
61
-
62
-
63
-
64
-
65
-
66
-
67
-
68
-
69
-
70
-
71
-
72
-
73
-
74
-
75
-
76
-
77
-
78
-
79
-
80
-
81
-
82
-
83
-
84
-
85
-
86
-
87
-
88
-
89
-
90
-
91
-
92
-
93
-
94
-
95
-
96
 |
 |

2.
Disconnect the WLAN antenna cable
(1)
, and remove the tape
(2)
holding it in place, disconnect the
display cable
(3)
, and then release the cable from the routing channels
(4)
.
3.
Rotate the display assembly
(1)
, and then remove the display assembly
(2)
from the base enclosure.
NOTE:
For display panel and display component removal procedures, see
Display panel
on page
60
.
Reverse this procedure to install the display assembly.
38
Chapter 5
Removal and replacement procedures for authorized service provider parts