HP OmniBook 5500 HP OmniBook 5500 - User Guide, Windows for Workgroups - Page 25
To insert and remove a CD, To insert a PC card
 |
View all HP OmniBook 5500 manuals
Add to My Manuals
Save this manual to your list of manuals |
Page 25 highlights
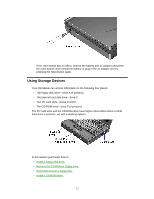
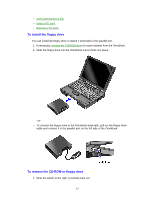
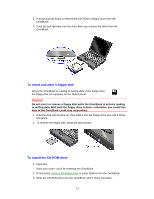
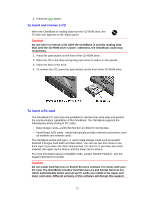
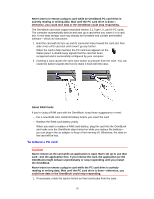
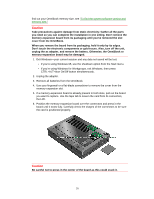
4. Press the reset button. To insert and remove a CD When the OmniBook is reading data from the CD-ROM drive, the CD disk icon appears on the Status panel. Caution Do not insert or remove a CD while the OmniBook is actively reading data. Wait until the CD-ROM drive is done-otherwise, the OmniBook could stop responding. 1. Press the open button on the front of the CD-ROM drive . 2. Place the CD in the drive and gently press down to seat it on the spindle. 3. Close the door to the drive. 4. To remove the CD, press the open button on the front of the CD-ROM drive. To insert a PC card The OmniBook PC card slots are available for devices that store data and expand the communication capabilities of the OmniBook. The OmniBook supports the following two kinds of plug-in PC cards: • Data storage cards-cards that function as disks for storing data. • Input/Output (I/O) cards-cards that typically provide external connections, such as modems and network cards. The OmniBook works with type I, II, and III data storage cards such as HewlettPackard ATA-type hard disks and flash disks. You can use two thin cards or one thick card. If you have one thick card inserted, it is drive E. If you have two cards inserted, the upper card is drive E and the lower card is drive F. For more information about compatible cards, contact Hewlett-Packard-see the Support and Service booklet. Caution Do not install Card Services or Socket Services software if it comes with your PC card. The OmniBook includes Card Services 2.1 and Socket Services 2.1, which automatically detect and set up PC cards you install in the upper and lower card slots. Different versions of this software will disrupt this support. 25
-
 1
1 -
2
-
3
-
4
-
5
-
6
-
7
-
8
-
9
-
10
-
11
-
12
-
13
-
14
-
15
-
16
-
17
-
18
-
19
-
 20
20 -
 21
21 -
 22
22 -
 23
23 -
 24
24 -
 25
25 -
 26
26 -
 27
27 -
 28
28 -
 29
29 -
 30
30 -
31
-
32
-
33
-
34
-
35
-
36
-
37
-
38
-
39
-
40
-
41
-
42
-
43
-
44
-
45
-
46
-
47
-
48
-
49
-
50
-
51
-
52
-
53
-
54
-
55
-
56
-
57
-
58
-
59
-
60
-
61
-
62
-
63
-
64
-
65
-
66
-
67
-
68
-
69
-
70
-
71
-
72
-
73
-
74
-
75
-
76
-
77
-
78
-
79
-
80
-
81
-
82
-
83
-
84
-
85
-
86
-
87
-
88
-
89
-
90
-
91
 |
 |
