HP OmniBook 5500 HP OmniBook 5500 - User Guide, Windows for Workgroups - Page 28
Caution
 |
View all HP OmniBook 5500 manuals
Add to My Manuals
Save this manual to your list of manuals |
Page 28 highlights
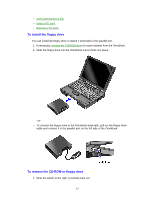
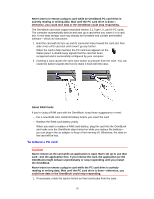
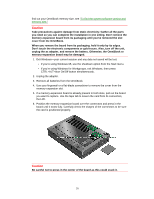
find out your OmniBook memory size, see "To find the system software version and memory size." Caution Take precautions against damage from static electricity: Gather all the parts you need so you can complete the installation in one sitting. Don't remove the memory-expansion board from its packaging until you've removed the slot cover from the OmniBook. When you remove the board from its packaging, hold it only by its edges. Don't touch the electronic components or gold traces. Also, turn off the unit, unplug the ac adapter, and remove the battery. Otherwise, the OmniBook or memory-expansion board may be damaged. 1. Exit Windows-your current session and any data not saved will be lost. • If you're using Windows 95, use the shutdown option from the Start menu. • If you're using Windows for Workgroups, exit Windows, then press CTRL+ALT+blue On/Off button simultaneously. 2. Unplug the adapter. 3. Remove all batteries from the OmniBook. 4. Use your fingernail or a flat-blade screwdriver to remove the cover from the memory-expansion slot. 5. If a memory-expansion board is already present in both slots, pull out the board you want to replace. Use the tape tab to loosen the card from its connectors, then lift. 6. Position the memory-expansion board over the connectors and press in the board until it seats fully. Carefully check the shapes of the connectors to be sure the card is positioned properly. Caution Be careful not to press in the center of the board as this could crack it. 28
-
 1
1 -
2
-
3
-
4
-
5
-
6
-
7
-
8
-
9
-
10
-
11
-
12
-
13
-
14
-
15
-
16
-
17
-
18
-
19
-
20
-
21
-
22
-
 23
23 -
 24
24 -
 25
25 -
 26
26 -
 27
27 -
 28
28 -
 29
29 -
 30
30 -
 31
31 -
 32
32 -
 33
33 -
34
-
35
-
36
-
37
-
38
-
39
-
40
-
41
-
42
-
43
-
44
-
45
-
46
-
47
-
48
-
49
-
50
-
51
-
52
-
53
-
54
-
55
-
56
-
57
-
58
-
59
-
60
-
61
-
62
-
63
-
64
-
65
-
66
-
67
-
68
-
69
-
70
-
71
-
72
-
73
-
74
-
75
-
76
-
77
-
78
-
79
-
80
-
81
-
82
-
83
-
84
-
85
-
86
-
87
-
88
-
89
-
90
-
91
 |
 |
