HP P4000 9.0 HP StorageWorks P4000 Multi-Site HA/DR Solution Pack User Guide - Page 25
Creating sites, Viewing the Multi-Site cluster information, The Sites view
 |
View all HP P4000 manuals
Add to My Manuals
Save this manual to your list of manuals |
Page 25 highlights
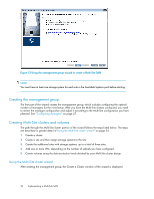
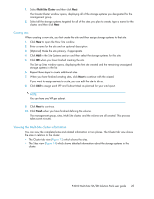
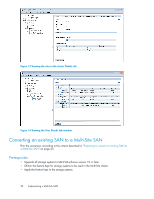
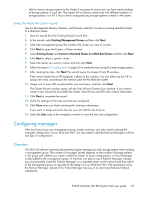
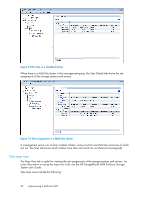
1. Select Multi-Site Cluster and then click Next. The Create Cluster window opens, displaying all of the storage systems you designated for the management group. 2. Select all the storage systems targeted for all of the sites you plan to create, type a name for the cluster, and then click Next. Creating sites When creating a new site, you first create the site and then assign storage systems to that site: 1. Click New to open the New Site window. 2. Enter a name for the site and an optional description. 3. [Optional] Make the site primary, if appropriate. 4. Click Add in the Site Systems section and then select the storage systems for this site. 5. Click OK when you have finished creating the site. The Set up Sites window opens, displaying the first site created and the remaining unassigned storage systems in the list. 6. Repeat these steps to create additional sites. 7. When you have finished creating sites, click Next to continue with the wizard. If you want to assign servers to a site, you can edit the site to do so. 8. Click Add to assign each VIP and Subnet Mask as planned for your site layout. NOTE: You can have one VIP per subnet. 9. Click Next to continue. 10. Click Finish when you have finished defining the volume. The management group, sites, Multi-Site cluster, and the volume are all created. This process takes some minutes. Viewing the Multi-Site cluster information You can view the completed sites and related information in two places. The Cluster tab view shows the sites in relation to the cluster. • The Cluster tab view (Figure 13) which shows the sites. • The Sites view (Figure 14) which shows detailed information about the storage systems in the cluster. P4000 Multi-Site HA/DR Solution Pack user guide 25
-
 1
1 -
2
-
3
-
4
-
5
-
6
-
7
-
8
-
9
-
10
-
11
-
12
-
13
-
14
-
15
-
16
-
17
-
18
-
19
-
 20
20 -
 21
21 -
 22
22 -
 23
23 -
 24
24 -
 25
25 -
 26
26 -
 27
27 -
 28
28 -
 29
29 -
 30
30 -
31
-
32
-
33
-
34
-
35
-
36
-
37
-
38
-
39
-
40
-
41
-
42
-
43
-
44
-
45
-
46
-
47
-
48
-
49
-
50
 |
 |