HP P6000 HP P6300/P6500 EVA M6612/6625 Disk Enclosure Installation Instruction - Page 11
Open HP P6000 Command View., Adding a disk enclosure to the P6300 EVA
 |
View all HP P6000 manuals
Add to My Manuals
Save this manual to your list of manuals |
Page 11 highlights
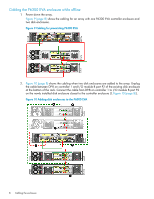
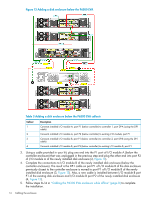
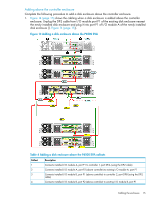
Figure 11 Adding a disk enclosure to the P6300 EVA Table 2 Adding a disk enclosure to the P6300 EVA callouts Callout 1 2 3 4 Description Connects controller 2, DP-B to newly installed I/O module B port P1 Connects existing I/O module B port P1 to newly installed I/O module I/O module B, port P2 Connects controller 1, DP-A to newly installed I/O module A port P1 Connects existing I/O module A, port P1 to newly installed I/O module A, port P2 4. Using a long cable, plug one end into port P1 of I/O module B that was unplugged in the previous step and plug the other end into port P2 of I/O module B on the newly installed disk enclosure (2, Figure 11). In steps 3 and 4, connections to I/O module B are made first. However, either I/O module can be cabled first as long as the other I/O module ports are not unplugged until cabling is complete on the first I/O module and you have completed step 6. This enables the controllers to redundantly manage storage while the cables are briefly pulled and reconnected on one side. NOTE: With only one I/O module from the newly added enclosure cabled to the array, there will be HP P6000 Command View warnings that indicate disk drives in the system are only connected on one of the redundant loops. This is to be expected, and the warnings should clear as soon as the other I/O module is connected. 5. Once you connect one I/O module (for example, B), verify the status of the I/O module B ports and the presence of the newly added disk enclosures before you connect the other I/O modules (in this example, A). Failure to complete this verification could result in potential loss of data access for an extended period of time. Complete the following steps to verify: a. Open HP P6000 Command View. b. Navigate to the newly added disk enclosure within the Hardware folder in the navigation pane and select it. The Disk Enclosure Properties window opens. c. Select the I/O tab. Cabling the enclosure 11
-
 1
1 -
2
-
3
-
4
-
5
-
 6
6 -
 7
7 -
 8
8 -
 9
9 -
 10
10 -
 11
11 -
 12
12 -
 13
13 -
 14
14 -
 15
15 -
 16
16 -
17
 |
 |
