HP Pavilion 14-n100 Maintenance and Service Guide - Page 61
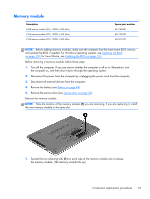
Memory module, Note the location of the memory module
 |
View all HP Pavilion 14-n100 manuals
Add to My Manuals
Save this manual to your list of manuals |
Page 61 highlights
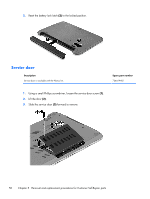
Memory module Description 4 GB memory module (PC3, 12800, 1600 MHz) 2 GB memory module (PC3, 12800, 1600 MHz) 8 GB memory module (PC3, 12800, 1600 MHz) Spare part number 691740-001 691739-001 693374-001 NOTE: Before adding memory modules, make sure the computer has the most recent BIOS version, and update the BIOS if needed. For Windows operating systems, see Updating the BIOS on page 105; for Linux Ubuntu, see Updating the BIOS on page 110. Before removing a memory module, follow these steps: 1. Turn off the computer. If you are unsure whether the computer is off or in Hibernation, turn the computer on, and then shut it down through the operating system. 2. Disconnect the power from the computer by unplugging the power cord from the computer. 3. Disconnect all external devices from the computer. 4. Remove the battery (see Battery on page 49). 5. Remove the service door (see Service door on page 50). Remove the memory module: NOTE: Note the location of the memory module (1) you are removing. If you are replacing it, install the new memory module in the same slot. 1. Spread the two retaining tabs (1) on each side of the memory module slot to release the memory module. (The memory module tilts up.) Component replacement procedures 51
-
 1
1 -
2
-
3
-
4
-
5
-
6
-
7
-
8
-
9
-
10
-
11
-
12
-
13
-
14
-
15
-
16
-
17
-
18
-
19
-
20
-
21
-
22
-
23
-
24
-
25
-
26
-
27
-
28
-
29
-
30
-
31
-
32
-
33
-
34
-
35
-
36
-
37
-
38
-
39
-
40
-
41
-
42
-
43
-
44
-
45
-
46
-
47
-
48
-
49
-
50
-
51
-
52
-
53
-
54
-
55
-
 56
56 -
 57
57 -
 58
58 -
 59
59 -
 60
60 -
 61
61 -
 62
62 -
 63
63 -
 64
64 -
 65
65 -
 66
66 -
67
-
68
-
69
-
70
-
71
-
72
-
73
-
74
-
75
-
76
-
77
-
78
-
79
-
80
-
81
-
82
-
83
-
84
-
85
-
86
-
87
-
88
-
89
-
90
-
91
-
92
-
93
-
94
-
95
-
96
-
97
-
98
-
99
-
100
-
101
-
102
-
103
-
104
-
105
-
106
-
107
-
108
-
109
-
110
-
111
-
112
-
113
-
114
-
115
-
116
-
117
-
118
-
119
-
120
-
121
-
122
-
123
-
124
-
125
-
126
-
127
-
128
-
129
-
130
-
131
-
132
-
133
-
134
-
135
-
136
-
137
-
138
-
139
-
140
-
141
-
142
 |
 |