HP Pavilion Touch 14-n200 Maintenance and Service Guide 1 - Page 98
Display assembly
 |
View all HP Pavilion Touch 14-n200 manuals
Add to My Manuals
Save this manual to your list of manuals |
Page 98 highlights
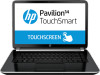
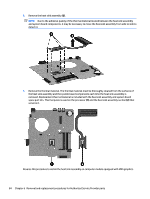
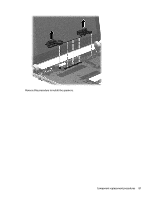
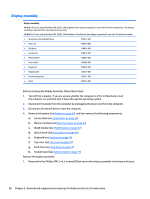
Display assembly Display assembly: 14.0 in (35.56 cm), high definition (HD), WLED, SVA BrightView flat display assembly for use with HP Pavilion Notebooks. This display assembly is spared at the subcomponent level only. 14.0 in (35.56 cm), high definition (HD), WLED, SVA BrightView TouchSmart slim display assembly for use with TouchSmart models: ● Aluminum with midnight black 734414-001 ● Flyer red 734410-001 ● Goji berry 736814-001 ● Hazel berry 736815-001 ● Mineral black 736813-001 ● Pearl white 734409-001 ● Raspberry 736816-001 ● Regal purple 734412-001 ● Revolutionary blue 734411-001 ● Silver 734413-001 Before removing the display assembly, follow these steps: 1. Turn off the computer. If you are unsure whether the computer is off or in Hibernation, turn the computer on, and then shut it down through the operating system. 2. Disconnect the power from the computer by unplugging the power cord from the computer. 3. Disconnect all external devices from the computer. 4. Remove the battery (see Battery on page 42), and then remove the following components: a. Service door (see Service door on page 43) b. Memory module (see Memory module on page 45) c. WLAN module (see WLAN module on page 47) d. Optical drive (see Optical drive on page 49) e. Keyboard (see Keyboard on page 55) f. Top cover (see Top cover on page 59) g. Hard drive (see Hard drive on page 63) h. System board (see System board on page 71) Remove the display assembly: 1. Remove the five Phillips PM2.5×6.5 screws (1) that secure the display assembly to the base enclosure. 88 Chapter 6 Removal and replacement procedures for Authorized Service Provider parts
-
 1
1 -
2
-
3
-
4
-
5
-
6
-
7
-
8
-
9
-
10
-
11
-
12
-
13
-
14
-
15
-
16
-
17
-
18
-
19
-
20
-
21
-
22
-
23
-
24
-
25
-
26
-
27
-
28
-
29
-
30
-
31
-
32
-
33
-
34
-
35
-
36
-
37
-
38
-
39
-
40
-
41
-
42
-
43
-
44
-
45
-
46
-
47
-
48
-
49
-
50
-
51
-
52
-
53
-
54
-
55
-
56
-
57
-
58
-
59
-
60
-
61
-
62
-
63
-
64
-
65
-
66
-
67
-
68
-
69
-
70
-
71
-
72
-
73
-
74
-
75
-
76
-
77
-
78
-
79
-
80
-
81
-
82
-
83
-
84
-
85
-
86
-
87
-
88
-
89
-
90
-
91
-
92
-
 93
93 -
 94
94 -
 95
95 -
 96
96 -
 97
97 -
 98
98 -
 99
99 -
 100
100 -
 101
101 -
 102
102 -
 103
103 -
104
-
105
-
106
-
107
-
108
-
109
-
110
-
111
-
112
-
113
-
114
-
115
-
116
-
117
-
118
-
119
-
120
-
121
-
122
-
123
-
124
-
125
-
126
-
127
-
128
-
129
 |
 |