HP Photosmart C5100 Basics Guide - Page 20
Copies & s, Printing Shortcuts - for windows 7
 |
View all HP Photosmart C5100 manuals
Add to My Manuals
Save this manual to your list of manuals |
Page 20 highlights
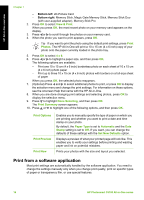
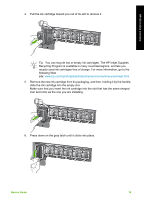
HP All-in-One overview To print from a software application (Windows) 1. Make sure you have paper loaded in the input tray. 2. On the File menu in your software application, click Print. 3. Select the HP All-in-One as the printer. If you set the HP All-in-One as the default printer, you can skip this step. The HP Allin-One will already be selected. 4. If you need to change settings, click the button that opens the Properties dialog box. Depending on your software application, this button might be called Properties, Options, Printer Setup, Printer, or Preferences. Note When printing a photo, you must select options for the correct paper type and photo enhancement. 5. Select the appropriate options for your print job by using the features available in the Advanced, Printing Shortcuts, Features, and Color tabs. Tip You can easily select the appropriate options for your print job by choosing one of the predefined print tasks on the Printing Shortcuts tab. Click a type of print task in the Printing Shortcuts list. The default settings for that type of print task are set and summarized on the Printing Shortcuts tab. If necessary, you can adjust the settings here and save your custom settings as a new printing shortcut. To save a custom printing shortcut, select the shortcut and click Save. To delete a shortcut, select the shortcut and click Delete. 6. Click OK to close the Properties dialog box. 7. Click Print or OK to begin printing. To print from a software application (Mac) 1. Make sure you have paper loaded in the input tray. 2. From the File menu in your software application, choose Page Setup. The Page Setup dialog box appears, allowing you to specify the paper size, orientation, and scaling. 3. Make sure the HP All-in-One is the selected printer. 4. Specify the page attributes: - Choose the paper size. - Select the orientation. - Enter the scaling percentage. 5. Click OK. 6. From the File menu in your software application, choose Print. The Print dialog box appears, and the Copies & Pages panel opens. 7. Change the print settings for each option in the pop-up menu, as appropriate for your project. Note When printing a photo, you must select options for the correct paper type and photo enhancement. 8. Click Print to begin printing. Basics Guide 17
-
 1
1 -
2
-
3
-
4
-
5
-
6
-
7
-
8
-
9
-
10
-
11
-
12
-
13
-
14
-
 15
15 -
 16
16 -
 17
17 -
 18
18 -
 19
19 -
 20
20 -
 21
21 -
 22
22 -
 23
23 -
 24
24 -
 25
25 -
26
-
27
-
28
-
29
-
30
-
31
-
32
-
33
-
34
-
35
-
36
-
37
-
38
-
39
-
40
-
41
-
42
-
43
-
44
-
45
 |
 |