HP Photosmart Pro B8800 User Guide - Page 13
Print from the specialty media tray (single-sheet feed), Paper Source, Source, Main tray - windows 7 driver
 |
View all HP Photosmart Pro B8800 manuals
Add to My Manuals
Save this manual to your list of manuals |
Page 13 highlights
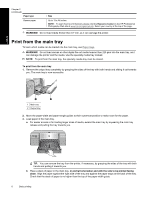
English Chapter 2 8. Make sure the Paper Source (Windows) or Source (Mac) setting in the printer driver is set to Main tray or Automatically Select, so that the printer will feed media from the main tray. NOTE: When you select a Paper Type, the driver automatically sets the Paper Source (Windows) or Source (Mac) to the recommended paper tray. For some media types, you may override the recommended paper source setting. However, if a yellow warning symbol appears (Windows), or the driver does not allow that selection (Mac), use the specialty media tray instead to avoid printer damage or poor print quality. See Print from the specialty media tray (single-sheet feed) for information on printing from the specialty media tray. 9. Send your print job from the computer. NOTE: If you are using non-HP brands of glossy media in the main tray, and the printer does not feed the paper or feeds multiple sheets through at once, try reducing the number of sheets in the main tray to 20 sheets, or use the specialty media tray to print on one sheet at a time. Print from the specialty media tray (single-sheet feed) To learn which media can be loaded into the specialty media tray, see Paper trays. It is recommended that before you print on expensive specialty media, you practice using the specialty media tray by loading a single sheet of plain paper and printing an image or document. NOTE: You do not need to remove media from the main tray before you use the specialty media tray. To print from the specialty media tray 1. Check that there is space behind the printer for the paper to pass back and forth through the rear paper slot. The space behind the printer should be equivalent to the length of the paper you are printing on. NOTE: Do not feed paper into the rear paper slot. 2. Lower the specialty media tray. The Resume light flashes while the printer raises the printhead assembly in preparation for printing from the specialty media tray. When the Resume light stops flashing, you can load media into the tray. 1 Specialty media tray (single-sheet feed) 3. Pull out the output tray extension by holding the output tray with one hand and pulling out the extension with your other hand. Flip up the paper catch at the end of the output tray extension to prevent paper from falling. 10 Basic printing
-
 1
1 -
2
-
3
-
4
-
5
-
6
-
7
-
 8
8 -
 9
9 -
 10
10 -
 11
11 -
 12
12 -
 13
13 -
 14
14 -
 15
15 -
 16
16 -
 17
17 -
 18
18 -
19
-
20
-
21
-
22
-
23
-
24
-
25
-
26
-
27
-
28
-
29
-
30
-
31
-
32
-
33
-
34
-
35
-
36
-
37
-
38
-
39
-
40
-
41
-
42
-
43
-
44
-
45
-
46
-
47
-
48
-
49
-
50
-
51
-
52
-
53
-
54
-
55
-
56
-
57
-
58
-
59
-
60
-
61
-
62
-
63
-
64
-
65
-
66
-
67
-
68
-
69
-
70
-
71
-
72
-
73
-
74
-
75
-
76
-
77
-
78
-
79
-
80
-
81
-
82
-
83
-
84
-
85
-
86
-
87
-
88
-
89
-
90
-
91
-
92
-
93
-
94
 |
 |
