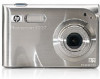
HP Photosmart R927 User Guide
HP Photosmart R927 Manual
 |
View all HP Photosmart R927 manuals
Add to My Manuals
Save this manual to your list of manuals |
HP Photosmart R927 manual content summary:
- HP Photosmart R927 | User Guide - Page 1
HP Photosmart R927 Digital Camera User Guide - HP Photosmart R927 | User Guide - Page 2
© Copyright 2006 Hewlett-Packard Development Company, L.P. The information contained herein is subject to change without notice. The only warranties for HP products and services are set forth in the express warranty statements accompanying such products and services. Nothing herein should - HP Photosmart R927 | User Guide - Page 3
Camera front and bottom 6 Camera dock and insert 6 Before taking pictures 7 Install the battery 7 Charge the battery 7 Turn on the camera 7 Choose the language 8 Set the region 8 Set the date and time 8 Install and format an optional memory card 8 Install the software 9 Using your camera - HP Photosmart R927 | User Guide - Page 4
images with HP Photosmart Software 35 Transferring images without HP Photosmart Software 35 Connecting to the computer 36 Using a memory card reader 36 Printing images from the camera 36 Printing panoramas from the camera 37 6 Using HP Photosmart Express 38 Using the Photosmart Express Menu - HP Photosmart R927 | User Guide - Page 5
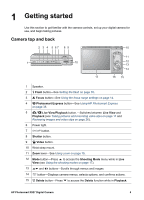
while in Live View (see Using the shooting modes on page 17). 13 and buttons-Scrolls through menus and images. 14 button-Displays camera menus, selects options, and confirms actions. 15 Delete button-Press to access the Delete function while in Playback. HP Photosmart R927 Digital Camera 5 - HP Photosmart R927 | User Guide - Page 6
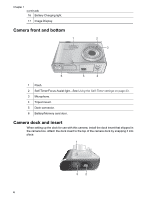
Chapter 1 (continued) 16 Battery Charging light. 17 Image Display. Camera front and bottom 1 2 3 6 5 4 1 Flash. 2 Self-Timer/Focus Assist light-See Using the Self-Timer settings on page 23. 3 Microphone. 4 Tripod mount. 5 Dock connector. 6 Battery/Memory card door. Camera dock and insert When - HP Photosmart R927 | User Guide - Page 7
using it the first time (see Charge the battery on page 7). Charge the battery You can charge a battery in the camera using an optional AC power adapter or in the extra battery bay of an optional HP Photosmart camera dock. 1. Connect the AC power adapter to the dock, then plug it into an electrical - HP Photosmart R927 | User Guide - Page 8
an optional memory card 1. Turn off the camera and open the Battery/ Memory card door. 2. Insert the optional memory card in the smaller slot as shown. Make sure the memory card snaps into place. 3. Close the Battery/Memory card door and turn on the camera. Always format memory cards before first - HP Photosmart R927 | User Guide - Page 9
has finished installing, re-enable virus protection software. Macintosh 1. Insert the HP Photosmart Software CD into the CD drive. 2. Double-click the CD icon on the computer desktop. 3. Double-click the installer icon, then follow the on-screen instructions. HP Photosmart R927 Digital Camera 9 - HP Photosmart R927 | User Guide - Page 10
specified in HP Photosmart Premier Software. ● HP Photosmart Mac Software (for Macintosh systems). To learn more about the software features and how to use them, see the Help feature in the HP Photosmart Software. Using your camera Now that you've completed setup, you can take and review still - HP Photosmart R927 | User Guide - Page 11
The Live View display looks like this: 1 Shooting mode indicator. 2 Memory card indicator. 3 Battery level indicator (see Power indicators on page 51). 4 12 Pictures remaining count. 5 Focus brackets the Shutter button down, then release it when done. HP Photosmart R927 Digital Camera 11 - HP Photosmart R927 | User Guide - Page 12
release the Video button. 4. To stop recording video, press and release the Video button again. Instant Review After you have taken a still image or recorded a video clip, the camera displays it in Instant Review. If you want to delete the image or video clip, press , select This Image from the - HP Photosmart R927 | User Guide - Page 13
range settings on page 14). ● Use Manual Focus (see Using Manual Focus on page 15). For the Macro focus range If the camera is set to Macro and cannot focus, the camera will not take the picture. Try one or to focus in low light or low contrast situations. HP Photosmart R927 Digital Camera 13 - HP Photosmart R927 | User Guide - Page 14
on page 16). ● Set the camera on a tripod or stable surface. focus or exposure when you review it in Playback, use Image how to correct the problem for similar images light, or grainy images in Troubleshooting on page 43 ● Using the Compensation on page 24 ● Using Manual Focus on page 15 Using the - HP Photosmart R927 | User Guide - Page 15
hold the camera still or add more light to the scene. Try holding the camera closer to your body or against a steady object, or set the camera on a tripod or stable surface. Optical zoom Optical zoom moves the lens between wide angle (1x) and telephoto (3x). HP Photosmart R927 Digital Camera 15 - HP Photosmart R927 | User Guide - Page 16
lever to control zoom. Press to zoom in and to zoom out. Digital zoom In digital zoom, the Image Display shows a yellow frame around the scene. 1. In Removal under Using the Capture Menu on page 20). Flash Off-The camera does not use flash. Use this setting to capture poorly lit subjects beyond - HP Photosmart R927 | User Guide - Page 17
a result, you must set the camera on a tripod or stable surface. Night Scenery-For capturing night scenes. This mode uses a long exposure with no flash. As a result, you must set the camera on a tripod or stable surface. Beach-For capturing scenes at the beach. HP Photosmart R927 Digital Camera 17 - HP Photosmart R927 | User Guide - Page 18
surround the shooting mode, then press . Manual-For specifying both F-number and shutter speed (see Using Manual shooting mode on page 19). My Mode-For camera (see Stitching panoramas on page 29). Depending on the HP Photosmart Software version you installed (see About the HP Photosmart Software - HP Photosmart R927 | User Guide - Page 19
press to end the panoramic sequence. During Instant Review (see Instant Review on page 12), each image in the panoramic Panorama mode, see Recording audio on page 30. Using Manual shooting mode Manual mode lets you specify both F-number (aperture) and camera. HP Photosmart R927 Digital Camera 19 - HP Photosmart R927 | User Guide - Page 20
to the My Mode Capture Menu. 6. To exit the My Mode Capture Menu, press . Using the Capture Menu The Capture Menu allows you to adjust camera settings that affect the characteristics of the images and video clips you capture. 1. While in Live View, press to display the Capture Menu. 2. Use to - HP Photosmart R927 | User Guide - Page 21
in full color, black & white, and sepia. During Instant Review (see Instant Review on page 12), you can delete the entire bracketing sequence. 8MP, 5MP, 2MP, VGA) and compression ( to ). Use to move between Resolution and Compression, and to specify a setting. HP Photosmart R927 Digital Camera - HP Photosmart R927 | User Guide - Page 22
on your target subject. To set the white balance, select Manual, then follow the onscreen instructions. Auto Focus Area-Selects between a wide, multi-zone focus of the scene. AE Metering-Specifies which region of a scene the camera uses to calculate the exposure. ● Average-Useful when you want the - HP Photosmart R927 | User Guide - Page 23
the still image or begins recording the video clip. If you chose On - 2 Shots and are taking a still image, the camera takes the second still image a few seconds after the first. 6. If you are recording a video clip, press the Video button to stop recording. HP Photosmart R927 Digital Camera 23 - HP Photosmart R927 | User Guide - Page 24
as possible until you release the Shutter button or the camera runs out of memory. The Image Display remains off during the burst capture. After the burst images have been taken, each image appears one at a time in Instant Review (see Instant Review on page 12). You can delete the entire burst - HP Photosmart R927 | User Guide - Page 25
page 20). White Balance Different lighting conditions cast different colors. This setting allows the camera to compensate for this, reproducing colors more accurately and ensuring that whites appear white in (or noise) and, therefore, can be of lower quality. HP Photosmart R927 Digital Camera 25 - HP Photosmart R927 | User Guide - Page 26
images and video clips You can review and manipulate images and video clips in Playback as Memory card indicator. 2 Battery indicator (see Power indicators on page 51). 3 Image position in a panoramic sequence. 4 Number of electronic Photosmart Share destinations (see Using HP Photosmart - HP Photosmart R927 | User Guide - Page 27
press . 2. Use to highlight an option. 3. Use to select an image or video clip, press instructions. 4. Press to exit the Playback Menu. , and follow the on-screen Delete-See Deleting images on page 28. View Slideshow-See Viewing slideshows on page 29. HP Photosmart R927 Digital Camera 27 - HP Photosmart R927 | User Guide - Page 28
the current image is part of a panoramic sequence, deletes all images in the panoramic sequence. - All Images (in Memory/on Card)-Deletes all stored images and video clips. - Format (Memory/Card)-Deletes all stored files, then formats the internal memory or memory card. Tip To delete a displayed - HP Photosmart R927 | User Guide - Page 29
light pixels in the captured image. 6 Memory card indicator. 7 File name of the image. HP Photosmart Software on page 35). 1. Scroll to one of the images in a panoramic sequence. 2. Use to select Stitch Panorama, then press to view a preview of the stitched image. HP Photosmart R927 Digital Camera - HP Photosmart R927 | User Guide - Page 30
to the displayed image, press . Note You can attach audio clips to individual images in a panoramic sequence. When you stitch the panoramic sequence (on-camera or on-computer), no audio is attached to the stitched image. You can, however, add audio to a stitched panorama as previously described. If - HP Photosmart R927 | User Guide - Page 31
Gallery Menu tab. 3. Use to highlight an option, then press and follow the on-screen instructions. Apply Artistic Effects-See Applying artistic effects on page 31. Modify Color-See Modifying colors on page with a feathered color that fades from the bottom up. HP Photosmart R927 Digital Camera 31 - HP Photosmart R927 | User Guide - Page 32
an extra color layer to create a mood or feeling. 3. Press to select the color scheme and display the creative sub-menu. Follow the on-screen instructions to adjust the color. 4. Press to save a copy of the image with the specified color scheme and return to the Design Gallery Menu. Press Modify - HP Photosmart R927 | User Guide - Page 33
crops the displayed image to a 2:3 aspect ratio (one-third taller than wide). - Help-Provides extended help information for the Crop function. Follow the on-screen instructions to use the Zoom lever and adjust what appears in the cropped image. HP Photosmart R927 Digital Camera 33 - HP Photosmart R927 | User Guide - Page 34
Chapter 4 When you print, the normal aspect ratios get cropped on the top and bottom (landscape) or on the sides (portrait). Cropping helps ensure that the content you want gets printed. 3. Press to save a copy of the cropped image and return to the Design Gallery Menu. Press to exit without - HP Photosmart R927 | User Guide - Page 35
the USB cable that came with your camera. 3. Place the camera in the dock. 4. Turn on the camera and follow the instructions on the computer screen to transfer the images. For more information, see the Help feature in the HP Photosmart Software. Transferring images without HP Photosmart Software If - HP Photosmart R927 | User Guide - Page 36
transferred, return the memory card to your camera. For Macintosh computers: 1. Insert your camera's memory card into the memory card reader (or into your computer's memory card slot). 2. Either the HP Photosmart Software, Image Capture, or iPhoto starts automatically and guides you through the - HP Photosmart R927 | User Guide - Page 37
the Panorama Printing Menu, cancels all pending and inprogress print jobs, and returns to the Print Setup Menu. 5. When you are done printing, remove the camera from the dock. HP Photosmart R927 Digital Camera 37 - HP Photosmart R927 | User Guide - Page 38
HP Photosmart Software on page 9. Note Available online services vary by country or region. Visit www.hp.com/go/ sharing. Using the Photosmart Express Menu To display the Photosmart Express Menu, press . To select a menu option, use to highlight a selection, then press . For on-camera information - HP Photosmart R927 | User Guide - Page 39
images to mark for printing, use to display an image, press , and repeat Step 4. 6. To exit the Photosmart Express Menu, press . 7. Connect the camera to a PictBridge-certified printer via the dock. The images you selected are automatically printed. HP Photosmart R927 Digital Camera 39 - HP Photosmart R927 | User Guide - Page 40
, then press . A appears over Buy Prints Online in the Photosmart Express Menu. To deselect the image, press again. 5. Turn off your camera, connect the camera to your computer via the dock, then turn on your camera. Follow the instructions in the Buy Prints Online dialog box to purchase prints - HP Photosmart R927 | User Guide - Page 41
the camera. See Connecting to the computer on page 36. ● Digital Camera (Default)--Recognizes the camera as a digital camera using PTP (Picture Transfer Protocol). ● Disk Drive-Recognizes the camera as a disk drive using MSDC (Mass Storage Device Class). HP Photosmart R927 Digital Camera 41 - HP Photosmart R927 | User Guide - Page 42
, Argentina, and parts of Asia. (Language)-Sets the language. See Choose the language on page 8. Reset Settings-Resets camera to the factory default settings. ● Cancel-Exits the menu without resetting any of the settings. ● Yes-Resets all camera settings to - HP Photosmart R927 | User Guide - Page 43
the memory card (see Install and format an optional memory card on page 8). If the camera still does not turn on, format the memory card using a memory card reader, or replace the memory card. The battery gauge goes up and down frequently. See Power indicators on page 51. HP Photosmart R927 Digital - HP Photosmart R927 | User Guide - Page 44
awhile. ● Use only the approved HP AC power adapter. ● If charging the battery in the HP quick recharger or the spare battery charging bay of an optional HP Photosmart dock does not work, replace the battery. The camera does not turn on when I connect to AC power, then disconnect, then reconnect - HP Photosmart R927 | User Guide - Page 45
images are stored in internal memory. The Power light is on but the Image Display is off, or the camera seems stuck and won't operate. ● Press Live View/Playback to reactivate the Image Display. ● Reset the camera (see Resetting the camera on page 43 ). HP Photosmart R927 Digital Camera 45 - HP Photosmart R927 | User Guide - Page 46
to the camera dock and computer. ● Try connecting the USB cable to another USB port on the computer. ● Turn the camera off, then on again. If that does not fix the problem, reset the camera (see Resetting the camera on page 43). ● If the problem persists, contact HP Support (see Product support on - HP Photosmart R927 | User Guide - Page 47
camera packaging. ● Refer to the HP Customer Care website: www.hp.com/support. How can I get professional-quality prints if I don't have a photo printer? Use the Buy Prints Online feature on the Photosmart Express Menu (see Buying prints online on page 40). HP Photosmart R927 Digital Camera 47 - HP Photosmart R927 | User Guide - Page 48
for your digital camera, including links to helpful websites and an overview of the support process. Helpful websites Camera tips, product registration, newsletter subscriptions, driver and software updates, purchase HP supplies and accessories www.hp.com www.hp.com/photosmart (English only - HP Photosmart R927 | User Guide - Page 49
to extend or upgrade your camera's warranty, please contact the store where you bought the camera or check the HP Care Pack offers at www.hp.com/support. 6. If you already purchased an HP Care Pack Service, please check the support conditions on your contract. HP Photosmart R927 Digital Camera 49 - HP Photosmart R927 | User Guide - Page 50
in Playback without extending the lens. ● Connect the camera to the HP AC power adapter via the dock when you transfer or print. Safety precautions for using batteries ● Do not place the battery in fire or heat the battery. Always store charged batteries in a cool location. ● Do not connect the - HP Photosmart R927 | User Guide - Page 51
camera. Number of shots per battery type The following table shows the minimum, maximum, and average number of shots that may be obtained using the rechargeable HP Photosmart R07 Lithium Ion battery. Minimum 110 Maximum 200 Number of Shots Average 165 CIPA 200 HP Photosmart R927 Digital Camera - HP Photosmart R927 | User Guide - Page 52
HP AC power adapter through the dock In camera connected to the HP AC power adapter through an HP Photosmart dock 2-3 hours In battery bay of the HP 2-3 hours Photosmart 6221 Premium Camera Dock In an HP Photosmart RSeries quick recharger 1 hour Signals Charging: Camera's battery charging - HP Photosmart R927 | User Guide - Page 53
use, the Lithium Ion battery may begin to swell. If it becomes difficult to insert the battery into or remove the battery from the camera, dock, or quick recharger, discontinue use of the battery and replace it with a new one. Please recycle the old battery. HP Photosmart R927 Digital Camera 53 - HP Photosmart R927 | User Guide - Page 54
positions between wide and telephoto ● 8x digital zoom Focus settings: Normal Focus (Default), Macro, Auto Macro, Infinity, Manual Focus Normal Focus (Default): ● Wide- Normal focus Infinity-Focus is fixed at infinity Manual-Focus is user-adjustable 1/2000 to 16 seconds Yes, 6-second typical recharge - HP Photosmart R927 | User Guide - Page 55
HP Photosmart R-series cameras ● HP AC power adapter (5 Vdc, 2000 mA, 10 W) with either the HP Photosmart 6220 dock (included) or (optional) HP Photosmart 6221 or 6222 dock Temperature range Operational 0° to 50° C (32° to 122° F) at 15% to 85% relative humidity HP Photosmart R927 Digital Camera - HP Photosmart R927 | User Guide - Page 56
to 90% relative humidity Memory capacity Not all 32MB of internal memory is available for storing images, because some memory is used for internal camera operations. The actual file sizes and number of still images that can be stored in internal memory or on a memory card will vary depending on the - HP Photosmart R927 | User Guide - Page 57
View/Playback button 5 M Macro focus 13, 15 Magnify control 5 magnifying images 27 Manual focus 15 Manual mode 18, 19 memory capacity 56 card 11 card door 6 memory card 8, 55 Menu/OK button 5 menus Capture 20 Design Gallery 31 Photosmart Express 38 Playback 27 HP Photosmart R927 Digital Camera 57 - HP Photosmart R927 | User Guide - Page 58
18 software install 9 solving problems 43 sounds of camera 41 Sounds Volume 41 space remaining in memory 11 specifications 54 Stitch Panorama 29 storage 55 Sunset mode 18 support process 48 T Theatre mode 17 Thumbnails 27 Thumbnails control 5 Time & Date 8, 41 transfer images 35 troubleshooting 43
-
 1
1 -
 2
2 -
 3
3 -
 4
4 -
 5
5 -
 6
6 -
 7
7 -
8
-
9
-
10
-
11
-
12
-
13
-
14
-
15
-
16
-
17
-
18
-
19
-
20
-
21
-
22
-
23
-
24
-
25
-
26
-
27
-
28
-
29
-
30
-
31
-
32
-
33
-
34
-
35
-
36
-
37
-
38
-
39
-
40
-
41
-
42
-
43
-
44
-
45
-
46
-
47
-
48
-
49
-
50
-
51
-
52
-
53
-
54
-
55
-
56
-
57
-
58
 |
 |

User Guide
HP Photosmart R927
Digital Camera