HP Photosmart R927 User Guide - Page 23
Using the Self-Timer settings, Date & Time Imprint
 |
View all HP Photosmart R927 manuals
Add to My Manuals
Save this manual to your list of manuals |
Page 23 highlights
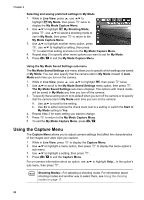
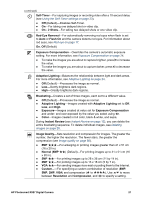
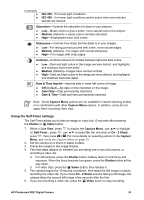
(continued) ● ● ISO 200-For lower light conditions. ISO 400-For lower light conditions and/or action when short shutter speeds are desired. Saturation-Controls the saturation of colors in your pictures. ● Low-Mutes colors to give a softer, more natural look to the subject. ● Medium (Default)-Leaves colors normally saturated. ● High-Emphasizes more vivid colors. Sharpness-Controls how sharp the fine detail is in your images. ● Low-For taking portrait pictures with softer, more natural edges. ● Medium (Default)-For edges with normal sharpness. ● High-For images with crisp edges. Contrast-Controls amount of contrast between light and dark colors. ● Low-Dark and light colors in the image are less distinct, and highlights and shadows have more detail. ● Medium (Default)-Images have normal contrast. ● High-Dark and light colors in the image are more distinct, and highlights and shadows have less detail. Date & Time Imprint-Imprints date in lower left corner of image. ● Off (Default)-No date or time imprinted on the image. ● Date Only-Date permanently imprinted. ● Date & Time-Date and time permanently imprinted. Note Some Capture Menu options are not available in certain shooting modes or in combination with other Capture Menu options. In addition, some do not apply when recording video clips. Using the Self-Timer settings The Self-Timer allows you to take an image or video clip 10 seconds after pressing the Shutter or Video button. 1. While in Live View, press to display the Capture Menu, use to highlight Self-Timer , press , use to select On (for one shot) or On - 2 Shots, press , then press . For more details on selecting options in the Capture Menu, see Using the Capture Menu on page 20. 2. Set the camera on a tripod or stable surface. 3. Frame the subject in the Image Display. 4. The next steps depend on whether you are taking one or two still pictures, or recording a video clip. a. For still pictures, press the Shutter button halfway down to lock focus and exposure. When the focus brackets turn green, press the Shutter button all the way down. b. For video clips, press the Video button, then release it. 5. The camera begins the 10-second countdown, then takes the still image or begins recording the video clip. If you chose On - 2 Shots and are taking a still image, the camera takes the second still image a few seconds after the first. 6. If you are recording a video clip, press the Video button to stop recording. HP Photosmart R927 Digital Camera 23
-
 1
1 -
2
-
3
-
4
-
5
-
6
-
7
-
8
-
9
-
10
-
11
-
12
-
13
-
14
-
15
-
16
-
17
-
 18
18 -
 19
19 -
 20
20 -
 21
21 -
 22
22 -
 23
23 -
 24
24 -
 25
25 -
 26
26 -
 27
27 -
 28
28 -
29
-
30
-
31
-
32
-
33
-
34
-
35
-
36
-
37
-
38
-
39
-
40
-
41
-
42
-
43
-
44
-
45
-
46
-
47
-
48
-
49
-
50
-
51
-
52
-
53
-
54
-
55
-
56
-
57
-
58
 |
 |