HP Pro 3520 PC Maintenance & Service Guide HP Pro 3520 All-in-One Business - Page 74
Lift the heat sink up and off the computer., To replace the heat sink, reverse the removal procedures.
 |
View all HP Pro 3520 PC manuals
Add to My Manuals
Save this manual to your list of manuals |
Page 74 highlights
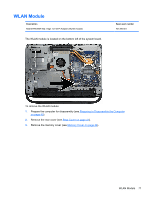
4. Remove the non-captive Torx screw (1) on the left side of the heat sink, and then loosen the four captive screws (2) on the right side of the heat sink. Be sure to loosen and tighten the screws in an alternating pattern. 5. Lift the heat sink up and off the computer. To replace the heat sink, reverse the removal procedures. NOTE: Tighten the four captive heat sink screws in an alternating pattern. 66 Chapter 7 Removal and Replacement Procedures All-in One (AIO) Chassis
-
 1
1 -
2
-
3
-
4
-
5
-
6
-
7
-
8
-
9
-
10
-
11
-
12
-
13
-
14
-
15
-
16
-
17
-
18
-
19
-
20
-
21
-
22
-
23
-
24
-
25
-
26
-
27
-
28
-
29
-
30
-
31
-
32
-
33
-
34
-
35
-
36
-
37
-
38
-
39
-
40
-
41
-
42
-
43
-
44
-
45
-
46
-
47
-
48
-
49
-
50
-
51
-
52
-
53
-
54
-
55
-
56
-
57
-
58
-
59
-
60
-
61
-
62
-
63
-
64
-
65
-
66
-
67
-
68
-
 69
69 -
 70
70 -
 71
71 -
 72
72 -
 73
73 -
 74
74 -
 75
75 -
 76
76 -
 77
77 -
 78
78 -
 79
79 -
80
-
81
-
82
-
83
-
84
-
85
-
86
-
87
-
88
-
89
-
90
-
91
-
92
-
93
-
94
-
95
-
96
-
97
-
98
-
99
-
100
-
101
-
102
-
103
-
104
-
105
-
106
-
107
-
108
-
109
-
110
-
111
-
112
-
113
-
114
-
115
-
116
-
117
-
118
-
119
-
120
-
121
-
122
-
123
-
124
-
125
-
126
-
127
-
128
-
129
-
130
-
131
-
132
-
133
-
134
-
135
-
136
-
137
-
138
-
139
-
140
-
141
-
142
-
143
-
144
-
145
-
146
-
147
-
148
-
149
-
150
-
151
-
152
 |
 |

4.
Remove the non-captive Torx screw
(1)
on the left side of the heat sink, and then loosen the four
captive screws
(2)
on the right side of the heat sink. Be sure to loosen and tighten the screws in
an alternating pattern.
5.
Lift the heat sink up and off the computer.
To replace the heat sink, reverse the removal procedures.
NOTE:
Tighten the four captive heat sink screws in an alternating pattern.
66
Chapter 7
Removal and Replacement Procedures All-in One (AIO) Chassis