HP Pro 3520 PC Maintenance & Service Guide HP Pro 3520 All-in-One Business - Page 83
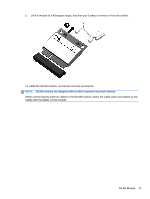
Note the thermal pad locations and replace any that are damaged., To install the system board
 |
View all HP Pro 3520 PC manuals
Add to My Manuals
Save this manual to your list of manuals |
Page 83 highlights
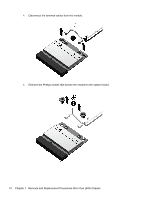
10. Remove the nine screws (circled in image) that secure the system board to the computer. 11. Lift the system board straight up and out of the computer. To install the system board, reverse the removal procedures. Note the thermal pad locations and replace any that are damaged. System Board 75
-
 1
1 -
2
-
3
-
4
-
5
-
6
-
7
-
8
-
9
-
10
-
11
-
12
-
13
-
14
-
15
-
16
-
17
-
18
-
19
-
20
-
21
-
22
-
23
-
24
-
25
-
26
-
27
-
28
-
29
-
30
-
31
-
32
-
33
-
34
-
35
-
36
-
37
-
38
-
39
-
40
-
41
-
42
-
43
-
44
-
45
-
46
-
47
-
48
-
49
-
50
-
51
-
52
-
53
-
54
-
55
-
56
-
57
-
58
-
59
-
60
-
61
-
62
-
63
-
64
-
65
-
66
-
67
-
68
-
69
-
70
-
71
-
72
-
73
-
74
-
75
-
76
-
77
-
 78
78 -
 79
79 -
 80
80 -
 81
81 -
 82
82 -
 83
83 -
 84
84 -
 85
85 -
 86
86 -
 87
87 -
 88
88 -
89
-
90
-
91
-
92
-
93
-
94
-
95
-
96
-
97
-
98
-
99
-
100
-
101
-
102
-
103
-
104
-
105
-
106
-
107
-
108
-
109
-
110
-
111
-
112
-
113
-
114
-
115
-
116
-
117
-
118
-
119
-
120
-
121
-
122
-
123
-
124
-
125
-
126
-
127
-
128
-
129
-
130
-
131
-
132
-
133
-
134
-
135
-
136
-
137
-
138
-
139
-
140
-
141
-
142
-
143
-
144
-
145
-
146
-
147
-
148
-
149
-
150
-
151
-
152
 |
 |

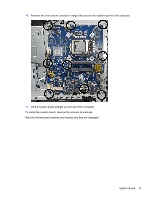
10.
Remove the nine screws (circled in image) that secure the system board to the computer.
11.
Lift the system board straight up and out of the computer.
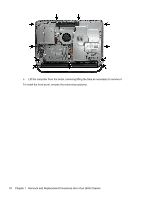
To install the system board, reverse the removal procedures.
Note the thermal pad locations and replace any that are damaged.
System Board
75