HP ProLiant SL165z HP ProLiant SL165z G6 Server Maintenance and Service Guide - Page 33
To remove hard drive, WARNING
 |
View all HP ProLiant SL165z manuals
Add to My Manuals
Save this manual to your list of manuals |
Page 33 highlights
Figure 5 Installing the hard drive assembly To remove hard drive: 1. Slide the HDD carrier latches to unlock the HDD handle. 2. Raise the HDD handle. 3. Lift the HDD assembly out of the tray 4. Rotate the HDD carrier handle down and then lock the HDD carrier latches. Figure 6 Removing the hard drive assembly WARNING: Ensure that the system is powered off and all power sources have been disconnected from the server. Voltages are present at various locations within the server whenever an AC power source is connected. This voltage is present even when the main power switch is in the off position. Removal and Replacement Procedures 33
-
 1
1 -
2
-
3
-
4
-
5
-
6
-
7
-
8
-
9
-
10
-
11
-
12
-
13
-
14
-
15
-
16
-
17
-
18
-
19
-
20
-
21
-
22
-
23
-
24
-
25
-
26
-
27
-
 28
28 -
 29
29 -
 30
30 -
 31
31 -
 32
32 -
 33
33 -
 34
34 -
 35
35 -
 36
36 -
 37
37 -
 38
38 -
39
-
40
-
41
-
42
-
43
-
44
-
45
-
46
-
47
-
48
-
49
-
50
-
51
-
52
-
53
-
54
-
55
-
56
-
57
-
58
-
59
-
60
-
61
-
62
-
63
-
64
-
65
-
66
-
67
-
68
-
69
-
70
-
71
-
72
-
73
-
74
-
75
-
76
-
77
-
78
-
79
-
80
 |
 |

Removal and Replacement Procedures
33
Figure 5
Installing the hard drive assembly
To remove hard drive:
1.
Slide the HDD carrier latches to unlock the HDD handle.
2.
Raise the HDD handle.
3.
Lift the HDD assembly out of the tray
4.
Rotate the HDD carrier handle down and then lock the HDD carrier latches.
Figure 6
Removing the hard drive assembly
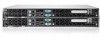
WARNING:
Ensure that the system is powered off and all power sources have been disconnected
from the server. Voltages are present at various locations within the server whenever an AC power
source is connected. This voltage is present even when the main power switch is in the off position.