HP R80xi HP OfficeJet R Series All-in-One - (English) Setup Guide and Faxing O - Page 57
Sharing HP OfficeJet on a Network
 |
UPC - 088698680193
View all HP R80xi manuals
Add to My Manuals
Save this manual to your list of manuals |
Page 57 highlights
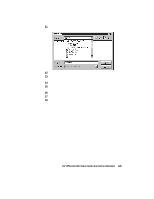
4 In the Printer Ports dialog box, choose Local Port, and click New Port. 5 In the Port Name dialog box, type in the name of the server to which the HP OfficeJet is connected and the share name assigned to the printer. 6 Click OK to close the Port Name dialog box and store your changes, and then click Close on the Printer Ports dialog box. 7 In the Available ports list, verify that the newly created port exists, and then click Next. 8 Click Have Disk, and insert the HP OfficeJet R Series software CD. 9 If the HP OfficeJet R Series software installation menu appears, click Quit. 10 Change the name of the drive letter to point to your CD-ROM drive, and click Browse. 4-4 Sharing HP OfficeJet on a Network
-
 1
1 -
2
-
3
-
4
-
5
-
6
-
7
-
8
-
9
-
10
-
11
-
12
-
13
-
14
-
15
-
16
-
17
-
18
-
19
-
20
-
21
-
22
-
23
-
24
-
25
-
26
-
27
-
28
-
29
-
30
-
31
-
32
-
33
-
34
-
35
-
36
-
37
-
38
-
39
-
40
-
41
-
42
-
43
-
44
-
45
-
46
-
47
-
48
-
49
-
50
-
51
-
 52
52 -
 53
53 -
 54
54 -
 55
55 -
 56
56 -
 57
57 -
 58
58 -
 59
59 -
 60
60 -
 61
61 -
 62
62 -
63
 |
 |

4-4
Sharing HP OfficeJet on a Network
4
In the
Printer Ports
dialog box, choose
Local Port
, and click
New Port
.
5
In the
Port Name
dialog box, type in the name of the server to which the
HP OfficeJet is connected and the share name assigned to the printer.
6
Click
OK
to close the
Port Name
dialog box and store your changes, and
then click
Close
on the
Printer Ports
dialog box.
7
In the
Available ports
list, verify that the newly created port exists, and
then click
Next
.
8
Click
Have Disk
, and insert the HP OfficeJet R Series software CD.
9
If the
HP OfficeJet R Series software installation menu
appears, click
Quit
.
10
Change the name of the drive letter to point to your CD-ROM drive, and
click
Browse
.