HP ScanJet 7800 User Guide - Page 27
Scanner paper path problems
 |
View all HP ScanJet 7800 manuals
Add to My Manuals
Save this manual to your list of manuals |
Page 27 highlights
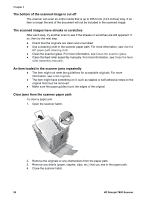
Scanner paper path problems Use this section to help resolve paper path issues that might occur when scanning. ● Paper jamming, skewing, misfeeds, or multiple-page feeds ● Paper does not feed from the scanner ● The bottom of the scanned image is cut off ● The scanned images have streaks or scratches ● An item loaded in the scanner jams repeatedly ● Clear jams from the scanner paper path ● Replace the feed-roller assembly Paper jamming, skewing, misfeeds, or multiple-page feeds ● If the pages look skewed as they feed into the scanner paper path, check the resulting scanned images in the software to ensure that they are not skewed. ● The pages might not be placed correctly. Straighten the pages and adjust the paper guides to center the stack. ● The paper guides must be touching the sides of the paper stack to work properly. Please ensure that the paper stack is straight and the guides are against the paper stack. ● The document feeder or output tray might contain more than the maximum number of pages. Load fewer pages in the document feeder, and remove pages from the output tray. ● Check to see that the scanner hatch is fully closed. ● Clean the scanner paper path to help reduce misfeeds. If this does not help, install the feed-roller assembly replacement kit. The feed-roller assembly replacement kit contains a feed-roller mechanism and a separation pad. For more information, see Replace the feed-roller assembly. Paper does not feed from the scanner The scanner hatch might not be securely latched. Open the scanner hatch and then close it by pressing firmly. A problem with the scanner hardware might exist. Follow this procedure to test the scanner: 1. Ensure that the power supply is securely connected between the scanner and a live electrical outlet or surge protector. Check that the green LED on the power supply connector is on to verify that the power supply is functional. 2. If the power supply is connected to a surge protector, ensure that the surge protector is plugged into an outlet and turned on. 3. Disconnect the power supply from the scanner and turn off the computer. After 60 seconds, reconnect the power supply to the scanner and then turn on the computer, in that order. 4. Try to rescan. 5. If the paper still does not feed properly, see the Product Support section of the printed Setup and Support Guide that came with the scanner. User Guide 25
-
 1
1 -
2
-
3
-
4
-
5
-
6
-
7
-
8
-
9
-
10
-
11
-
12
-
13
-
14
-
15
-
16
-
17
-
18
-
19
-
20
-
21
-
 22
22 -
 23
23 -
 24
24 -
 25
25 -
 26
26 -
 27
27 -
 28
28 -
 29
29 -
 30
30
 |
 |
