HP T5735 Administrator's Guide Linux-based HP Compaq t5735 Thin Client - Page 18
HP Network Manager, System Tools
 |
UPC - 883585606238
View all HP T5735 manuals
Add to My Manuals
Save this manual to your list of manuals |
Page 18 highlights
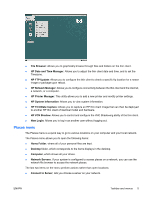
To launch Synaptic for the first time: 1. Click Desktop > Administration > Login Window, and click the Security tab. 2. Check the Allow local system administrator login check box. 3. Enter proxy information, if necessary (Applications > System Tools > HP Network Manager). 4. Log out and login again as root. 5. Select the Synaptic icon on the desktop. An xterm window opens. 6. Type Y, and then press Enter. The install results are displayed on-screen. 7. Read the installation results to confirm the packages successfully installed, and then close the window. NOTE: After running Synaptic for the first time, its icon changes. Alternatively, you can open a root terminal and enter the command aptitude update && aptitude install synaptic after performing any necessary proxy configuration, as described above. The Synaptic Package Manager window includes a pane (left) that allows you to list packages by category, a pane (upper right) that lists all packages within a selected category, and a pane (lower right) that provides information about a specific selected package. For detailed information about a package, including size, version number, dependencies, files, and more, right-click the package and select the Properties button. To install packages on the thin client: NOTE: Be sure to read the installation messages, as they can require user input. Installing or removing packages requires administrator root permissions. 1. Open Synaptic Package Manager by double-clicking Synaptic on the desktop. 2. Click Search to open the Find dialog box. 3. Type a parameter of what you are searching for in the Search field, then select the search category in the Look in list, and then click Search. The upper right pane displays all packages located based on your search criteria. 4. In the upper right pane, select the specific package to install. If desired, read about the selected package in the lower right pane. 5. In the dialog box, select the installation option based on the type of installation you are performing. 6. If necessary, repeat steps 2 - 5 to location and mark more packages for installation. 7. Click Apply. 8. Confirm the action and click Apply. 9. Click Close after all packages are successfully installed. 10 Chapter 1 Introduction ENWW
-
 1
1 -
2
-
3
-
4
-
5
-
6
-
7
-
8
-
9
-
10
-
11
-
12
-
 13
13 -
 14
14 -
 15
15 -
 16
16 -
 17
17 -
 18
18 -
 19
19 -
 20
20 -
 21
21 -
 22
22 -
 23
23 -
24
-
25
-
26
-
27
-
28
-
29
-
30
-
31
-
32
-
33
-
34
-
35
-
36
-
37
-
38
-
39
-
40
-
41
-
42
-
43
-
44
-
45
-
46
-
47
-
48
-
49
-
50
-
51
-
52
-
53
-
54
-
55
-
56
-
57
-
58
-
59
-
60
-
61
-
62
-
63
-
64
-
65
-
66
-
67
-
68
-
69
-
70
-
71
-
72
-
73
-
74
-
75
-
76
-
77
-
78
-
79
-
80
-
81
-
82
 |
 |
