HP Workstation i2000 hp workstation i2000 processor installation (a6037-90060) - Page 18
Properly Seating the Processor, Top View of Processor and Cross-Torque Pattern
 |
View all HP Workstation i2000 manuals
Add to My Manuals
Save this manual to your list of manuals |
Page 18 highlights
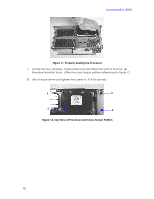
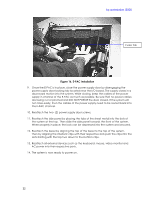
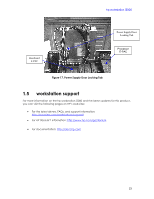
hp workstation i2000 Figure 11. Properly Seating the Processor 7. Locate the four- (4) brass, Castle-head nuts and fasten the nuts to the four- (4) threaded retention studs. Utilize the cross-torque pattern referenced in Figure 12. 8. Use a torque driver and tighten the screws to 10 inch-pounds. 1 4 3 2 Figure 12. Top View of Processor and Cross-Torque Pattern 18
-
 1
1 -
2
-
3
-
4
-
5
-
6
-
7
-
8
-
9
-
10
-
11
-
12
-
 13
13 -
 14
14 -
 15
15 -
 16
16 -
 17
17 -
 18
18 -
 19
19 -
 20
20 -
 21
21 -
 22
22 -
 23
23 -
24
 |
 |
hp workstation i2000
18
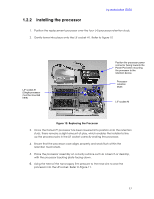
Figure 11. Properly Seating the Processor
7.
Locate the four- (4) brass, Castle-head nuts and fasten the nuts to the four- (4)
threaded retention studs.
Utilize the cross-torque pattern referenced in Figure 12.
8.
Use a torque driver and tighten the screws to 10 inch-pounds.
Figure 12. Top View of Processor and Cross-Torque Pattern
1
3
4
2