HP XP20000/XP24000 HP StorageWorks XP24000/XP20000 Disk Array Site Preparation - Page 63
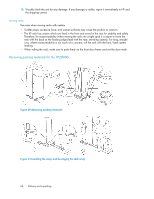
Removing packing materials for the XP24000, WARNING, CAUTION
 |
View all HP XP20000/XP24000 manuals
Add to My Manuals
Save this manual to your list of manuals |
Page 63 highlights
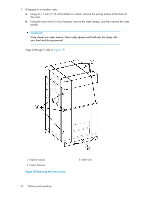
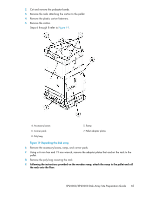
WARNING! When using sharp objects or cutting tools, make sure that no part of your body lies in the path of the blade bit or point. CAUTION: When disk array equipment is not located in a data center or computer room, it must be stored in a controlled area that meets environmental requirements. CAUTION: For the XP24000, when detached from each other, DKCs and DKUs do not have side panels. Exposed printed circuit boards (PCBs) are present; however, normal handling of the rack by the metal frames does not pose any ESD risks. 1. If shipped in a wooden crate, use an 11mm (7/16 in) ratchet or wrench to remove the six lag screws at the base of the crate. 2. Following the steps on page 63, unpack the equipment cartons outside the computer room to avoid debris and possible contamination of the computer room environment. 3. For software CDs, cables, and other installation hardware, leave the sealed cartons or packages intact. HP representatives will unpack them when they install and configure the disk array. 4. As you unpack the cartons, match the delivered items to the packing list (invoice) for each carton. Contact your HP service representative immediately if any items are missing or are not the ones you ordered. 5. Move all equipment to the computer room before the installation date. Removing packing materials for the XP24000 Unpack the DKC first. DKC packaging contains a wooden ramp; standard DKU packaging does not contain a ramp unless the DKU is shipped as an upgrade. You will use the ramp to unload both the DKC and DKUs. XP24000/XP20000 Disk Array Site Preparation Guide 63
-
 1
1 -
2
-
3
-
4
-
5
-
6
-
7
-
8
-
9
-
10
-
11
-
12
-
13
-
14
-
15
-
16
-
17
-
18
-
19
-
20
-
21
-
22
-
23
-
24
-
25
-
26
-
27
-
28
-
29
-
30
-
31
-
32
-
33
-
34
-
35
-
36
-
37
-
38
-
39
-
40
-
41
-
42
-
43
-
44
-
45
-
46
-
47
-
48
-
49
-
50
-
51
-
52
-
53
-
54
-
55
-
56
-
57
-
 58
58 -
 59
59 -
 60
60 -
 61
61 -
 62
62 -
 63
63 -
 64
64 -
 65
65 -
 66
66 -
 67
67 -
 68
68 -
69
-
70
-
71
-
72
-
73
-
74
-
75
-
76
-
77
-
78
 |
 |
