HP Z6100 HP Designjet Z6100 Printer Series - Setup Poster (42 inch) - Page 17
Mac OS
 |
UPC - 882780989535
View all HP Z6100 manuals
Add to My Manuals
Save this manual to your list of manuals |
Page 17 highlights
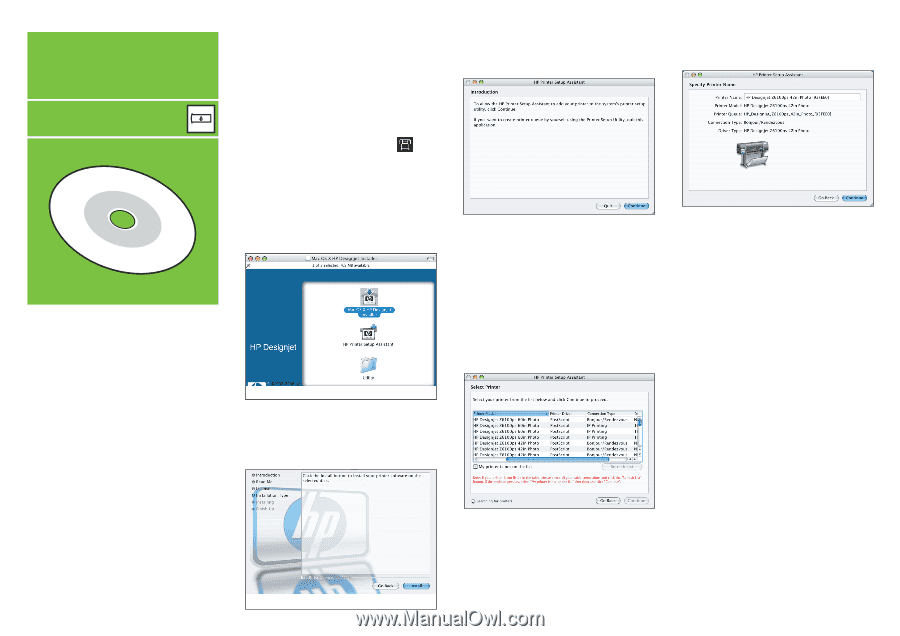
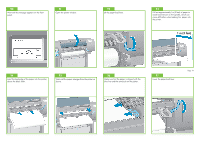
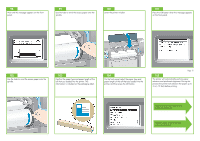
Mac OS Set up and connect your printer Box required 1. Set up and connect your printer (Mac OS X) Network connection (Bonjour/Rendezvous). 1. Make sure that the printer is turned on and connected to a functioning Ethernet network, and that all of the computers in the network are turned on and connected (including hubs and routers). 2. On the printer's front panel, select the icon, select Connectivity, Gigabit Ethernet, and then select View configuration. Note the mDNS service name that appears on the front panel. 3. Insert the HP Start-Up Kit CD/DVD into your CD/DVD rive, double-click the CD/DVD icon on your screen, and then look for the 'Mac OS X HP Designjet Installer' icon. 4. Double-click the appropriate icon to launch the installer, and then follow the onscreen instructions. Note: HP recommends that you use the Easy Install option. 5. When the software has been installed, the HP Printer Setup Assistant starts automatically to help you set up a connection to your printer. Follow the onscreen instructions. 8. The following screen displays information about the installation of your printer. If necessary, rename your printer and then click the Continue button. 6. In the HP Printer Setup Assistant, click the Continue button. 7. In the list of printers that appears, select a line that contains the mDNS service name of your printer in the Printer Name column, and 'Bonjour/Rendezvous' in the Connection Type column. Scroll sideways if necessary to see the Connection Type column. • If your printer appears in the list, click the Continue button and proceed to step 8. • If your printer does not appear in the list, proceed to step 10. 9. Continue following the onscreen instructions. When you reach the Printer Queue Created screen, click the Quit to exit, or click the Create New Queue if you want to connect another printer to the network. 10. Select My printer is not on the list and click the Continue button. 11. Select the connection type. Page 17 12. Follow the onscreen instructions that guide you through the process of connecting your printer to the network, and then click the Quit button to close the assistant window.
-
 1
1 -
2
-
3
-
4
-
5
-
6
-
7
-
8
-
9
-
10
-
11
-
 12
12 -
 13
13 -
 14
14 -
 15
15 -
 16
16 -
 17
17 -
 18
18 -
 19
19 -
 20
20
 |
 |