HP d640 HP D640 High-Volume Printer - Enhanced Features Manual, C5620-90027 - Page 17
Press Select; then, press Save.
 |
View all HP d640 manuals
Add to My Manuals
Save this manual to your list of manuals |
Page 17 highlights
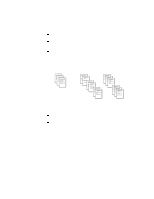
Note To change auto-collate on the printer: Step 1 Locate the control panel on the front of the printer and press Menu. A list of menus appears with Printing highlighted. Online Online Menu Printing Configuration PCL Comms Maintenance Step 2 Press ̈ to open the Printing menu. A list of Printing settings appears. Step 3 Press ̄ to scroll down the list of choices until auto-collate is highlighted. Printing Online Online HCI-Alias = HCI emulation = TIFF orientation = PORTRAIT lpi = 6.00 error-report = none auto-collate = OFF Step 4 Press ̈. The Printing.auto-collate settings appear. Setting choices are On and Off. Use auto-collate = Off to print uncollated copies. Use auto-collate = On to print collated copies. Step 5 Use the arrow keys to highlight the desired setting. Step 6 Press Select; then, press Save. The auto-collate setting is saved. After a few moments the printer's main screen appears. The auto-collate setting applies to all documents printed until you change the setting. Pressing Save stores the setting as part of the printer's power-on configuration. If you don't press Save, the setting remains active until the printer is reset or a new configuration is loaded. Chapter 2: Using Enhanced Features 13
-
 1
1 -
2
-
3
-
4
-
5
-
6
-
7
-
8
-
9
-
10
-
11
-
 12
12 -
 13
13 -
 14
14 -
 15
15 -
 16
16 -
 17
17 -
 18
18 -
 19
19 -
 20
20 -
 21
21 -
 22
22 -
23
-
24
-
25
-
26
-
27
-
28
-
29
-
30
-
31
-
32
-
33
-
34
-
35
-
36
-
37
-
38
-
39
-
40
-
41
-
42
-
43
-
44
-
45
-
46
-
47
-
48
-
49
-
50
-
51
-
52
-
53
-
54
-
55
-
56
-
57
-
58
-
59
-
60
-
61
-
62
-
63
-
64
-
65
-
66
 |
 |
