HP dx2390 Service Reference Guide: HP Compaq dx2390 Business PC - Page 52
Removing an Optical Drive, Preparation for Disassembly, on Computer Access Panel, Front Bezel
 |
View all HP dx2390 manuals
Add to My Manuals
Save this manual to your list of manuals |
Page 52 highlights
Removing an Optical Drive CAUTION: All removable media should be taken out of a drive before removing the drive from the computer. To remove an optical drive: 1. Prepare the computer for disassembly (Preparation for Disassembly on page 26). 2. Remove the computer access panel (Computer Access Panel on page 30). 3. Remove the front bezel (Front Bezel on page 31). 4. Disconnect the power cable (1) and data cable (2) from the rear of the optical drive. 5. Remove the screws that secure the drive to the drive cage (1), then slide the drive out of the front of the chassis (2). 46 Chapter 6 Removal and Replacement Procedures Microtower (MT) Chassis
-
 1
1 -
2
-
3
-
4
-
5
-
6
-
7
-
8
-
9
-
10
-
11
-
12
-
13
-
14
-
15
-
16
-
17
-
18
-
19
-
20
-
21
-
22
-
23
-
24
-
25
-
26
-
27
-
28
-
29
-
30
-
31
-
32
-
33
-
34
-
35
-
36
-
37
-
38
-
39
-
40
-
41
-
42
-
43
-
44
-
45
-
46
-
 47
47 -
 48
48 -
 49
49 -
 50
50 -
 51
51 -
 52
52 -
 53
53 -
 54
54 -
 55
55 -
 56
56 -
 57
57 -
58
-
59
-
60
-
61
-
62
-
63
-
64
-
65
-
66
-
67
-
68
-
69
-
70
-
71
-
72
-
73
-
74
-
75
-
76
-
77
-
78
-
79
-
80
-
81
-
82
-
83
-
84
-
85
-
86
-
87
-
88
-
89
-
90
-
91
-
92
-
93
-
94
-
95
-
96
-
97
-
98
-
99
-
100
-
101
-
102
-
103
-
104
 |
 |
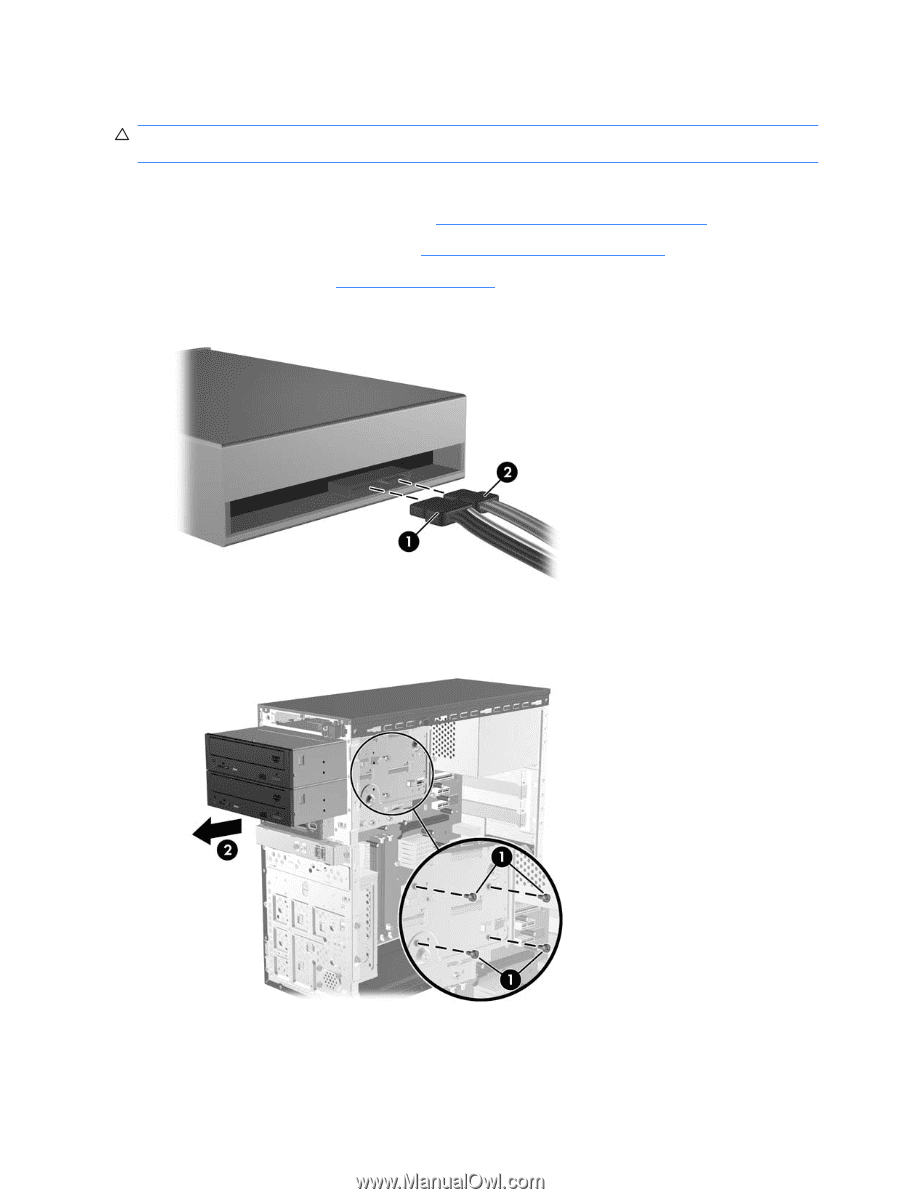
Removing an Optical Drive
CAUTION:
All removable media should be taken out of a drive before removing the drive from the
computer.
To remove an optical drive:
1.
Prepare the computer for disassembly (
Preparation for Disassembly
on page
26
).
2.
Remove the computer access panel (
Computer Access Panel
on page
30
).
3.
Remove the front bezel (
Front Bezel
on page
31
).
4.
Disconnect the power cable
(1)
and data cable
(2)
from the rear of the optical drive.
5.
Remove the screws that secure the drive to the drive cage
(1)
, then slide the drive out of the front
of the chassis
(2)
.
46
Chapter 6
Removal and Replacement Procedures Microtower (MT) Chassis