HP mp3135w HP mp3130 digital projector - (English) User Guide - Page 29
Making Basic Adjustments, To aim the projector
 |
View all HP mp3135w manuals
Add to My Manuals
Save this manual to your list of manuals |
Page 29 highlights
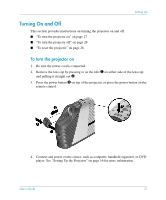
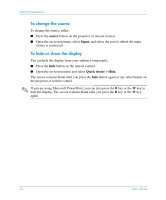
Setting Up Making Basic Adjustments This section provides instructions on making basic adjustments to the projector. ■ "To aim the projector" on page 29 ■ "To adjust the focus and zoom" on page 30 To aim the projector ✎ Whenever you press the tilt button to aim the projector, the supports pop out from the base and provide extra stability. ■ To raise the projected picture on the screen, press the tilt button 1, which causes the supports to pop out 2, and lift the front of the projector to the desired display angle 3. Release the tilt button to lock the adjustment. ■ To lower the projected picture, press the tilt button while lowering the front of the projector. Release the tilt button to lock the adjustment. ■ To store the projector, press the tilt button and lower the projector onto the base, then release the tilt button. Push the supports into the base. When you tilt the projector up or down, the sides of the picture might become slanted. However, the projector automatically adjusts the picture, so the sides are vertical. To fine-tune this adjustment, see "To adjust the shape of the picture" on page 35. User's Guide 29
-
 1
1 -
2
-
3
-
4
-
5
-
6
-
7
-
8
-
9
-
10
-
11
-
12
-
13
-
14
-
15
-
16
-
17
-
18
-
19
-
20
-
21
-
22
-
23
-
 24
24 -
 25
25 -
 26
26 -
 27
27 -
 28
28 -
 29
29 -
 30
30 -
 31
31 -
 32
32 -
 33
33 -
 34
34 -
35
-
36
-
37
-
38
-
39
-
40
-
41
-
42
-
43
-
44
-
45
-
46
-
47
-
48
-
49
-
50
-
51
-
52
-
53
-
54
-
55
-
56
-
57
-
58
-
59
-
60
-
61
-
62
-
63
-
64
-
65
-
66
-
67
-
68
-
69
-
70
-
71
-
72
-
73
-
74
-
75
-
76
-
77
-
78
-
79
-
80
-
81
-
82
-
83
-
84
 |
 |
