HP mp3135w HP mp3130 digital projector - (English) User Guide - Page 64
Help > Diagnostics., High-bandwidth Digital-Content Protection HDCP content
 |
View all HP mp3135w manuals
Add to My Manuals
Save this manual to your list of manuals |
Page 64 highlights
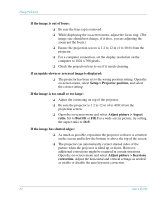
Fixing Problems ❏ Open the on-screen menu and select Adjust picture > Color space. Change the selection. ❏ Open the on-screen menu and select Help > Diagnostics. Run color tests. If the projected colors seem completely wrong: ❏ For a YPbPr or RGB input device, be sure all the video connectors are correctly matched. ❏ Be sure the pins on the cable connectors are not bent or broken. ❏ Open the on-screen menu and select Adjust picture > Color space. Change the selection. ❏ Open the on-screen menu and select Help > Diagnostics. Run color tests. ❏ Reset the picture settings to the factory-default settings. See the following problem. If the picture settings are completely wrong and you cannot fix them: ❏ Reset the projection settings to the factory-default settings. To do this, hold down the back + up + right buttons on the projector for 5 seconds. (This does not reset attachment module settings.) If a DVI device causes an error message or garbage on the screen: ❏ Certain high-definition digital sources incorporate High-bandwidth Digital-Content Protection (HDCP) content protection. Such content cannot be displayed by this projector. If the device has another output port, such as S-video, try connecting that port to the projector. If the projector stops responding to all controls: ❏ If possible, turn off the projector, then unplug the power cord and wait at least 15 seconds before reconnecting power. 64 User's Guide
-
 1
1 -
2
-
3
-
4
-
5
-
6
-
7
-
8
-
9
-
10
-
11
-
12
-
13
-
14
-
15
-
16
-
17
-
18
-
19
-
20
-
21
-
22
-
23
-
24
-
25
-
26
-
27
-
28
-
29
-
30
-
31
-
32
-
33
-
34
-
35
-
36
-
37
-
38
-
39
-
40
-
41
-
42
-
43
-
44
-
45
-
46
-
47
-
48
-
49
-
50
-
51
-
52
-
53
-
54
-
55
-
56
-
57
-
58
-
 59
59 -
 60
60 -
 61
61 -
 62
62 -
 63
63 -
 64
64 -
 65
65 -
 66
66 -
 67
67 -
 68
68 -
 69
69 -
70
-
71
-
72
-
73
-
74
-
75
-
76
-
77
-
78
-
79
-
80
-
81
-
82
-
83
-
84
 |
 |
