HP mp3135w HP mp3130 digital projector - (English) User Guide - Page 4

Adjusting the Projector, Installing Permanently, Adjusting the Picture and Sound .. .

Page 4 highlights

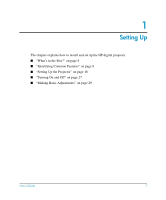
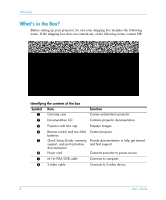
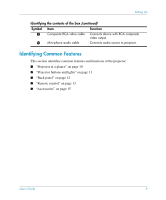
Contents 3 Adjusting the Projector Adjusting the Picture and Sound 35 To adjust the shape of the picture 35 To adjust the image according to the type of picture 36 To adjust other image settings 37 To adjust the audio 37 To adjust the projector setup 37 Using the On-Screen Menu 38 To change settings using the on-screen menu 39 Quick choice menu 40 Input menu 41 Adjust picture menu 42 Audio menu 44 Setup menu 44 Help menu 45 4 Maintaining the Projector Performing Routine Maintenance 47 To get the projector status 47 To clean the projector lens 47 To replace the lamp module 48 To replace the battery in the remote control 50 Upgrading the Projector 51 To update the firmware 51 5 Installing Permanently Installing the Projector 53 To mount the projector on a tripod 53 To install on a table 54 To install on the ceiling 55 To install for rear projection 56 To lock the projector 57 4 User's Guide

  • 1
  • 2
  • 3
  • 4
  • 5
  • 6
  • 7
  • 8
  • 9
  • 10
  • 11
  • 12
  • 13
  • 14
  • 15
  • 16
  • 17
  • 18
  • 19
  • 20
  • 21
  • 22
  • 23
  • 24
  • 25
  • 26
  • 27
  • 28
  • 29
  • 30
  • 31
  • 32
  • 33
  • 34
  • 35
  • 36
  • 37
  • 38
  • 39
  • 40
  • 41
  • 42
  • 43
  • 44
  • 45
  • 46
  • 47
  • 48
  • 49
  • 50
  • 51
  • 52
  • 53
  • 54
  • 55
  • 56
  • 57
  • 58
  • 59
  • 60
  • 61
  • 62
  • 63
  • 64
  • 65
  • 66
  • 67
  • 68
  • 69
  • 70
  • 71
  • 72
  • 73
  • 74
  • 75
  • 76
  • 77
  • 78
  • 79
  • 80
  • 81
  • 82
  • 83
  • 84

4
User’s Guide
Contents
3
Adjusting the Projector
Adjusting the Picture and Sound . . . . . . . . . . . . . . . . . . . . . . . . . . . . . . . . . . . . . . . . . . . . . .
35
To adjust the shape of the picture . . . . . . . . . . . . . . . . . . . . . . . . . . . . . . . . . . . . . . . . . .
35
To adjust the image according to the type of picture . . . . . . . . . . . . . . . . . . . . . . . . . . .
36
To adjust other image settings. . . . . . . . . . . . . . . . . . . . . . . . . . . . . . . . . . . . . . . . . . . . .
37
To adjust the audio . . . . . . . . . . . . . . . . . . . . . . . . . . . . . . . . . . . . . . . . . . . . . . . . . . . . .
37
To adjust the projector setup . . . . . . . . . . . . . . . . . . . . . . . . . . . . . . . . . . . . . . . . . . . . . .
37
Using the On-Screen Menu . . . . . . . . . . . . . . . . . . . . . . . . . . . . . . . . . . . . . . . . . . . . . . . . . .
38
To change settings using the on-screen menu . . . . . . . . . . . . . . . . . . . . . . . . . . . . . . . . .
39
Quick choice menu . . . . . . . . . . . . . . . . . . . . . . . . . . . . . . . . . . . . . . . . . . . . . . . . . . . . .
40
Input menu. . . . . . . . . . . . . . . . . . . . . . . . . . . . . . . . . . . . . . . . . . . . . . . . . . . . . . . . . . . .
41
Adjust picture menu . . . . . . . . . . . . . . . . . . . . . . . . . . . . . . . . . . . . . . . . . . . . . . . . . . . .
42
Audio menu . . . . . . . . . . . . . . . . . . . . . . . . . . . . . . . . . . . . . . . . . . . . . . . . . . . . . . . . . . .
44
Setup menu . . . . . . . . . . . . . . . . . . . . . . . . . . . . . . . . . . . . . . . . . . . . . . . . . . . . . . . . . . .
44
Help menu . . . . . . . . . . . . . . . . . . . . . . . . . . . . . . . . . . . . . . . . . . . . . . . . . . . . . . . . . . . .
45
4
Maintaining the Projector
Performing Routine Maintenance . . . . . . . . . . . . . . . . . . . . . . . . . . . . . . . . . . . . . . . . . . . . .
47
To get the projector status . . . . . . . . . . . . . . . . . . . . . . . . . . . . . . . . . . . . . . . . . . . . . . . .
47
To clean the projector lens . . . . . . . . . . . . . . . . . . . . . . . . . . . . . . . . . . . . . . . . . . . . . . .
47
To replace the lamp module . . . . . . . . . . . . . . . . . . . . . . . . . . . . . . . . . . . . . . . . . . . . . .
48
To replace the battery in the remote control . . . . . . . . . . . . . . . . . . . . . . . . . . . . . . . . . .
50
Upgrading the Projector. . . . . . . . . . . . . . . . . . . . . . . . . . . . . . . . . . . . . . . . . . . . . . . . . . . . .
51
To update the firmware . . . . . . . . . . . . . . . . . . . . . . . . . . . . . . . . . . . . . . . . . . . . . . . . . .
51
5
Installing Permanently
Installing the Projector. . . . . . . . . . . . . . . . . . . . . . . . . . . . . . . . . . . . . . . . . . . . . . . . . . . . . .
53
To mount the projector on a tripod . . . . . . . . . . . . . . . . . . . . . . . . . . . . . . . . . . . . . . . . .
53
To install on a table . . . . . . . . . . . . . . . . . . . . . . . . . . . . . . . . . . . . . . . . . . . . . . . . . . . . . 54
To install on the ceiling . . . . . . . . . . . . . . . . . . . . . . . . . . . . . . . . . . . . . . . . . . . . . . . . . .
55
To install for rear projection . . . . . . . . . . . . . . . . . . . . . . . . . . . . . . . . . . . . . . . . . . . . . .
56
To lock the projector . . . . . . . . . . . . . . . . . . . . . . . . . . . . . . . . . . . . . . . . . . . . . . . . . . . .
57