Hitachi DZ-MV380A Owners Guide - Page 143
Creating DVD Video on PC from DVD-RAM Disc, Recorded on DVD Video Camera/Recorder
 |
View all Hitachi DZ-MV380A manuals
Add to My Manuals
Save this manual to your list of manuals |
Page 143 highlights
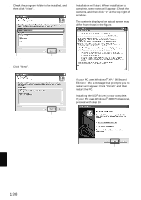
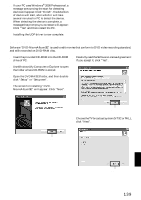
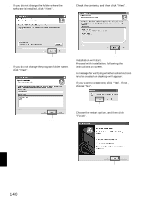
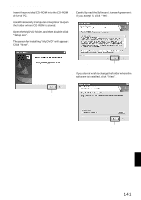
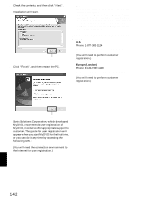
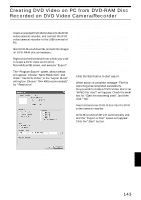
Creating DVD Video on PC from DVD-RAM Disc Recorded on DVD Video Camera/Recorder Using DVD-MovieAlbumSE and MyDVD, you can create a DVD video (DVD-R disc) from the images recorded on this DVD video camera/recorder, following the procedure below: 1 Insert a recorded DVD-RAM disc into the DVD video camera/recorder, and connect the DVD video camera/recorder to the USB terminal of PC. 2 Start DVD-MovieAlbumSE, and edit the images on DVD-RAM disc as necessary. 3 Right-click the thumbnail from which you wish to create a DVD video on the DVDMovieAlbumSE screen, and execute "Export". 4 The "Program Export" screen, shown below, will appear: Choose "Same Resolution" and check "Use DVD-Video" in the "Export Mode" setting box. Choose "704 × 480 (recommended)" for "Resolution". Note: • Choose "Divide by Marker" in the "Option" box: Each scene of program recorded on the DVD video camera/ recorder will be saved as an independent movie file so that export can be executed at high speed. If you do not choose "Divide by Marker", movie files may be unified and re-encoded, so it may take time to export them or the image quality may slightly deteriorate. DVD-MovieAlbumSE may automatically encode a movie recorded in the XTRA mode containing rapidly moving scenes (8 Mbps or higher), regardless of the "Divide by Marker" setting. • Do not choose "Simple Export" in the "Export Mode" setting box: Choosing it may stop export midway. 5 Click the Start button to start export. 6 When export is complete, message "The file exporting was completed successfully. Do you wish to create a 'DVD-Video' disc or an 'MPEG file' disc?" will appear. Check the small box for "Eject the disc being used", and then click "Yes". Insert a brand-new DVD-R disc into the DVD video camera/recorder. 7 DVD-MovieAlbumSE will automatically end, and the "Export to Disc" screen will appear: Click the "Start" button. "Program Export" Screen English 143
-
 1
1 -
2
-
3
-
4
-
5
-
6
-
7
-
8
-
9
-
10
-
11
-
12
-
13
-
14
-
15
-
16
-
17
-
18
-
19
-
20
-
21
-
22
-
23
-
24
-
25
-
26
-
27
-
28
-
29
-
30
-
31
-
32
-
33
-
34
-
35
-
36
-
37
-
38
-
39
-
40
-
41
-
42
-
43
-
44
-
45
-
46
-
47
-
48
-
49
-
50
-
51
-
52
-
53
-
54
-
55
-
56
-
57
-
58
-
59
-
60
-
61
-
62
-
63
-
64
-
65
-
66
-
67
-
68
-
69
-
70
-
71
-
72
-
73
-
74
-
75
-
76
-
77
-
78
-
79
-
80
-
81
-
82
-
83
-
84
-
85
-
86
-
87
-
88
-
89
-
90
-
91
-
92
-
93
-
94
-
95
-
96
-
97
-
98
-
99
-
100
-
101
-
102
-
103
-
104
-
105
-
106
-
107
-
108
-
109
-
110
-
111
-
112
-
113
-
114
-
115
-
116
-
117
-
118
-
119
-
120
-
121
-
122
-
123
-
124
-
125
-
126
-
127
-
128
-
129
-
130
-
131
-
132
-
133
-
134
-
135
-
136
-
137
-
 138
138 -
 139
139 -
 140
140 -
 141
141 -
 142
142 -
 143
143 -
 144
144 -
 145
145 -
 146
146 -
 147
147 -
 148
148 -
149
-
150
-
151
-
152
-
153
-
154
-
155
-
156
-
157
-
158
-
159
-
160
-
161
-
162
-
163
-
164
-
165
-
166
-
167
-
168
-
169
-
170
 |
 |
