Hitachi DZ-MV380A Owners Guide - Page 80
Setting Up Camera Functions
 |
View all Hitachi DZ-MV380A manuals
Add to My Manuals
Save this manual to your list of manuals |
Page 80 highlights
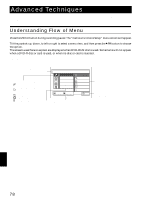
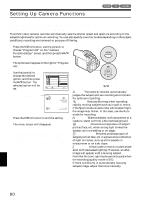
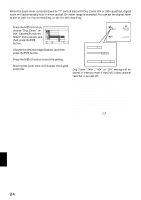
Setting Up Camera Functions SELECTING SHOOTING MODE TO MATCH THE SUBJECT (SWITCHING PROGRAM AE MODE) This DVD video camera/recorder automatically sets the shutter speed and aperture according to the subject brightness for optimum recording: You can also specify one of six modes depending on the subject conditions, recording environment or purpose of filming. 1 Press the MENU button, use the joystick to choose "Program AE" on the "Camera Functions Setup" screen, and then press the button. The options will appear on the right of "Program AE". 2 Use the joystick to choose the desired option, and then press the button: The selected option will be set. Camer a F u nc t i on s S e t u p P r o g r am AE Auto Wh i t e Ba l . Spo r t s EIS Por t r a i t D i g . Zoom Spo t l i ght M IC . F i l t e r Sand&Snow Low L i gh t ENTER RETURN RAM Selected AE mode 0:00:00 REM 3 0 MIN FINE 8 : 0 0 AM 9 / 3 0 / 2 00 3 3 Press the MENU button to end the setting. The menu screen will disappear. Note: • You can check the selected AE mode by the on-screen information display. However, nothing will appear in the Auto mode. • The shooting mode set as above will be stored in memory even if the DVD video camera/recorder is turned off. Tilt up/down and to left/ right to select, and then press to designate. Auto : The camera/recorder automatically judges the subject and surrounding environment for optimum recording. Sports : Reduces blurring when recording rapidly moving subjects such as in golf or tennis. If the Sports mode is used under a fluorescent light, the image may flicker: In this case, use the Auto mode for recording. Portrait : Makes a subject, such as a person or a creature, stand out from a blurred background. Spotlight : Prevents overexposure of subject portrait face, etc. when strong light strikes the subject, as in a wedding or on stage. Sand & Snow : Prevents underexposure of subject portrait face, etc. in a place where reflection of light is intense, such as at the seaside in midsummer or on a ski slope. Low Light : Allows user to record in a dark place even with decreased lighting: However, an afterimage will appear with a moving subject. Note that the Low Light mode cannot be used when the recording quality mode is STD. If there is difficulty in automatically focusing subject image, adjust the focus manually. English 80
-
 1
1 -
2
-
3
-
4
-
5
-
6
-
7
-
8
-
9
-
10
-
11
-
12
-
13
-
14
-
15
-
16
-
17
-
18
-
19
-
20
-
21
-
22
-
23
-
24
-
25
-
26
-
27
-
28
-
29
-
30
-
31
-
32
-
33
-
34
-
35
-
36
-
37
-
38
-
39
-
40
-
41
-
42
-
43
-
44
-
45
-
46
-
47
-
48
-
49
-
50
-
51
-
52
-
53
-
54
-
55
-
56
-
57
-
58
-
59
-
60
-
61
-
62
-
63
-
64
-
65
-
66
-
67
-
68
-
69
-
70
-
71
-
72
-
73
-
74
-
 75
75 -
 76
76 -
 77
77 -
 78
78 -
 79
79 -
 80
80 -
 81
81 -
 82
82 -
 83
83 -
 84
84 -
 85
85 -
86
-
87
-
88
-
89
-
90
-
91
-
92
-
93
-
94
-
95
-
96
-
97
-
98
-
99
-
100
-
101
-
102
-
103
-
104
-
105
-
106
-
107
-
108
-
109
-
110
-
111
-
112
-
113
-
114
-
115
-
116
-
117
-
118
-
119
-
120
-
121
-
122
-
123
-
124
-
125
-
126
-
127
-
128
-
129
-
130
-
131
-
132
-
133
-
134
-
135
-
136
-
137
-
138
-
139
-
140
-
141
-
142
-
143
-
144
-
145
-
146
-
147
-
148
-
149
-
150
-
151
-
152
-
153
-
154
-
155
-
156
-
157
-
158
-
159
-
160
-
161
-
162
-
163
-
164
-
165
-
166
-
167
-
168
-
169
-
170
 |
 |
