Hitachi DZHS300A Owners Guide - Page 128
Use the ImageMixer 3 Video Editor screen
 |
UPC - 050585223851
View all Hitachi DZHS300A manuals
Add to My Manuals
Save this manual to your list of manuals |
Page 128 highlights
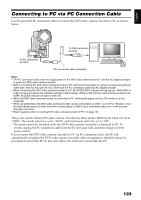
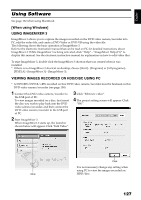
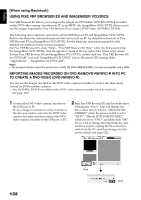
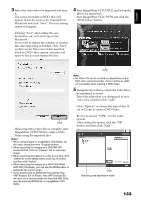
English 5 The screen for choosing the device to be imported will appear: Choose "Hitachi DVDCAM (HDD)" when the power switch is set to "HDD", "Hitachi DVDCAM" when it is set to "DVD", and then click "Import". If you wish to change the import device, and continue import, unplug the PC connection cable from the PC, and then change over the power switch (see page 123). Note: • When connecting the DVD video camera/recorder to a USB1.1 port of PC, the data transfer speed will be insufficient, which could result in lost frames. When the power switch is set to "DVD": Click 6 Use the ImageMixer 3 Video Editor screen to select a title/chapter you wish to play back, and then click "Preview". The image recorded on HDD or disc will appear. Select the title/chapter to be played back, and then click "Preview": Playback will start. Click the full-screen display button: A fullscreen image will appear. To exit the fullscreen display, double-click the screen. Click "Eject" button to play back the images on another disc. The cover of disc insertion block on DVD video camera/recorder will open: Remove the disc, and load another disc. Eject button 128 Click Full-screen display button
-
 1
1 -
2
-
3
-
4
-
5
-
6
-
7
-
8
-
9
-
10
-
11
-
12
-
13
-
14
-
15
-
16
-
17
-
18
-
19
-
20
-
21
-
22
-
23
-
24
-
25
-
26
-
27
-
28
-
29
-
30
-
31
-
32
-
33
-
34
-
35
-
36
-
37
-
38
-
39
-
40
-
41
-
42
-
43
-
44
-
45
-
46
-
47
-
48
-
49
-
50
-
51
-
52
-
53
-
54
-
55
-
56
-
57
-
58
-
59
-
60
-
61
-
62
-
63
-
64
-
65
-
66
-
67
-
68
-
69
-
70
-
71
-
72
-
73
-
74
-
75
-
76
-
77
-
78
-
79
-
80
-
81
-
82
-
83
-
84
-
85
-
86
-
87
-
88
-
89
-
90
-
91
-
92
-
93
-
94
-
95
-
96
-
97
-
98
-
99
-
100
-
101
-
102
-
103
-
104
-
105
-
106
-
107
-
108
-
109
-
110
-
111
-
112
-
113
-
114
-
115
-
116
-
117
-
118
-
119
-
120
-
121
-
122
-
 123
123 -
 124
124 -
 125
125 -
 126
126 -
 127
127 -
 128
128 -
 129
129 -
 130
130 -
 131
131 -
 132
132 -
 133
133 -
134
-
135
-
136
-
137
-
138
-
139
-
140
-
141
-
142
-
143
-
144
-
145
-
146
-
147
-
148
-
149
-
150
-
151
-
152
-
153
-
154
-
155
-
156
-
157
-
158
-
159
-
160
-
161
-
162
-
163
-
164
-
165
-
166
-
167
-
168
-
169
-
170
 |
 |
