Husqvarna 540i XP with battery and charger Owner Manual - Page 20
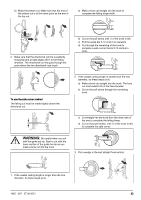
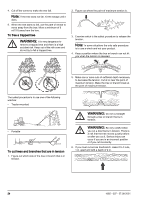
To cut a trunk that has support on two ends, To use the limbing technique
 |
View all Husqvarna 540i XP with battery and charger manuals
Add to My Manuals
Save this manual to your list of manuals |
Page 20 highlights
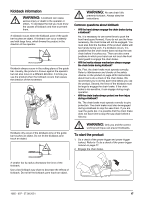
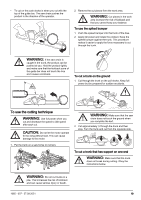
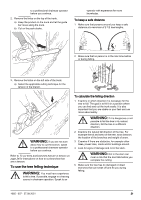
1. Cut on the push stroke approximately ⅓ through the trunk. 2. Cut through the trunk on the pull stroke until the two kerfs touch. WARNING: There is a high accident risk when you use the limbing technique. Refer to Kickback information on page 17 for instructions how to prevent kickback. WARNING: Cut limbs one by one. Be careful when you remove small limbs and do not cut bushes or many small limbs at the same time. Small limbs can get caught in the saw chain and prevent safe operation of the product. Note: If it is necessary, cut the limbs piece by piece. Cut the smaller branches (A) and (B) before you cut the limb near the trunk (C). To cut a trunk that has support on two ends WARNING: Make sure that the saw chain does not get caught in the trunk during cutting. Obey the instructions below. A B C 1. Cut on the pull stroke approximately ⅓ through the trunk. 2. Cut through the remaining part of the trunk on the push stroke to complete the cut. 1. Remove the limbs on the right side of the trunk. a) Keep the guide bar on the right side of the trunk and keep the body of the product against the trunk. b) Select the applicable cutting technique for the tension in the branch. WARNING: Stop the motor if the saw chain gets caught in the trunk. Use a lever to open up the kerf and remove the product. Do not try to pull the product out by hand. This can result in injury when the product suddenly breaks free. To use the limbing technique Note: For thick branches, use the cutting technique. Refer to To use the cutting technique on page 19. 20 WARNING: If you are not sure about how to cut the branch, speak 1065 - 007 - 27.09.2021
-
 1
1 -
2
-
3
-
4
-
5
-
6
-
7
-
8
-
9
-
10
-
11
-
12
-
13
-
14
-
 15
15 -
 16
16 -
 17
17 -
 18
18 -
 19
19 -
 20
20 -
 21
21 -
 22
22 -
 23
23 -
 24
24 -
 25
25 -
26
-
27
-
28
-
29
-
30
-
31
-
32
-
33
-
34
-
35
-
36
-
37
-
38
-
39
-
40
-
41
-
42
-
43
-
44
-
45
-
46
-
47
-
48
-
49
-
50
-
51
-
52
-
53
-
54
-
55
-
56
-
57
-
58
-
59
-
60
-
61
-
62
-
63
-
64
-
65
-
66
-
67
-
68
-
69
-
70
-
71
-
72
-
73
-
74
-
75
-
76
-
77
-
78
-
79
-
80
-
81
-
82
-
83
-
84
-
85
-
86
-
87
-
88
-
89
-
90
-
91
-
92
-
93
-
94
-
95
-
96
-
97
-
98
-
99
-
100
-
101
-
102
-
103
-
104
-
105
-
106
-
107
-
108
-
109
-
110
-
111
-
112
-
113
-
114
-
115
-
116
-
117
-
118
-
119
-
120
-
121
-
122
-
123
-
124
 |
 |
