Husqvarna 540i XP with battery and charger Owner Manual - Page 30
To sharpen the cutters, General information about how to adjust the depth gauge setting
 |
View all Husqvarna 540i XP with battery and charger manuals
Add to My Manuals
Save this manual to your list of manuals |
Page 30 highlights
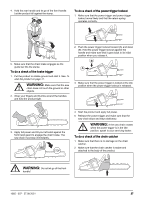
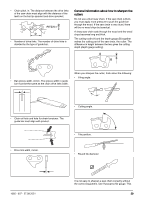
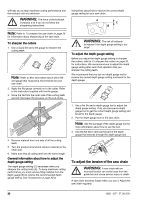
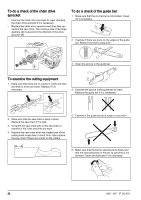
will help you to keep maximum cutting performance and the kickback risk at a minimum. WARNING: The force of the kickback increases a lot if you do not follow the sharpening instructions. instructions about how to receive the correct depth gauge setting for your saw chain. A C B Note: Refer to To sharpen the saw chain on page 28 for information about sharpening of the saw chain. To sharpen the cutters 1. Use a round file and a file gauge to sharpen the cutting teeth. Note: Refer to # for information about which file and gauge that Husqvarna recommends for your saw chain. 2. Apply the file gauge correctly on to the cutter. Refer to the instruction supplied with the file gauge. 3. Move the file from the inner side of the cutting teeth and out. Decrease the pressure on the pull stroke. WARNING: The risk of kickback increases if the depth gauge setting is too large! To adjust the depth gauge setting Before you adjust the depth gauge setting or sharpen the cutters, refer to To sharpen the cutters on page 30, for instructions. We recommend you to adjust the depth gauge setting after each third operation that you sharpen the cutting teeth. We recommend that you use our depth gauge tool to receive the correct depth gauge setting and bevel for the depth gauge. 4. Remove material from one side of all the cutting teeth. 5. Turn the product around and remove material on the other side. 6. Make sure that all cutting teeth are the same length. General information about how to adjust the depth gauge setting The depth gauge setting (C) decreases when you sharpen the cutting tooth (A). To keep maximum cutting performance you must remove filing material from the depth gauge (B) to receive the recommended depth gauge setting. See Accessories on page 35 for 1. Use a flat file and a depth gauge tool to adjust the depth gauge setting. Only use Husqvarna depth gauge tool to get the correct depth gauge setting and bevel for the depth gauge. 2. Put the depth gauge tool on the saw chain. Note: See the package of the depth gauge tool for more information about how to use the tool. 3. Use the flat file to remove the part of the depth gauge that extends through the depth gauge tool. To adjust the tension of the saw chain WARNING: A saw chain with an incorrect tension can come loose from the guide bar and cause serious injury or death. A saw chain becomes longer when you use it. Adjust the saw chain regularly. 30 1065 - 007 - 27.09.2021
-
 1
1 -
2
-
3
-
4
-
5
-
6
-
7
-
8
-
9
-
10
-
11
-
12
-
13
-
14
-
15
-
16
-
17
-
18
-
19
-
20
-
21
-
22
-
23
-
24
-
 25
25 -
 26
26 -
 27
27 -
 28
28 -
 29
29 -
 30
30 -
 31
31 -
 32
32 -
 33
33 -
 34
34 -
 35
35 -
36
-
37
-
38
-
39
-
40
-
41
-
42
-
43
-
44
-
45
-
46
-
47
-
48
-
49
-
50
-
51
-
52
-
53
-
54
-
55
-
56
-
57
-
58
-
59
-
60
-
61
-
62
-
63
-
64
-
65
-
66
-
67
-
68
-
69
-
70
-
71
-
72
-
73
-
74
-
75
-
76
-
77
-
78
-
79
-
80
-
81
-
82
-
83
-
84
-
85
-
86
-
87
-
88
-
89
-
90
-
91
-
92
-
93
-
94
-
95
-
96
-
97
-
98
-
99
-
100
-
101
-
102
-
103
-
104
-
105
-
106
-
107
-
108
-
109
-
110
-
111
-
112
-
113
-
114
-
115
-
116
-
117
-
118
-
119
-
120
-
121
-
122
-
123
-
124
 |
 |
