Husqvarna 540i XP with battery and charger Owner Manual - Page 31
To do a check of the saw chain lubrication, Product overview
 |
View all Husqvarna 540i XP with battery and charger manuals
Add to My Manuals
Save this manual to your list of manuals |
Page 31 highlights
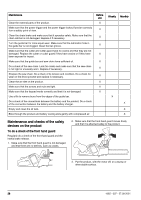
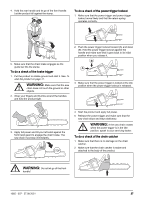
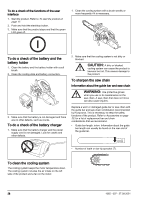
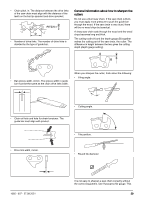
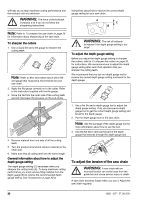
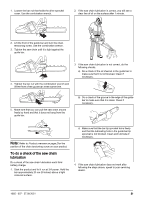
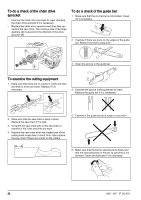
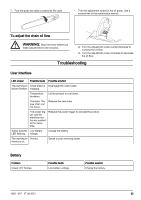
1. Loosen the bar nut that holds the drive sprocket cover. Use the combination wrench. 2. If the saw chain lubrication is correct, you will see a clear line of oil on the surface after 1 minute. 2. Lift the front of the guide bar and turn the chain tensioning screw. Use the combination wrench. 3. Tighten the saw chain until it is tight against the guide bar. 3. If the saw chain lubrication is not correct, do the following checks. a) Do a check of the oil channel in the guide bar to make sure that it is not blocked. Clean if necessary. 4. Tighten the bar nut with the combination wrench and lift the front of the guide bar at the same time. 5. Make sure that you can pull the saw chain around freely by hand and that it does not hang from the guide bar. b) Do a check of the groove in the edge of the guide bar to make sure that it is clean. Clean if necessary. Note: Refer to Product overview on page 2 for the position of the chain tensioning screw on your product. To do a check of the saw chain lubrication Do a check of the saw chain lubrication each third battery charge. 1. Start the product and let it run at 3/4 power. Hold the bar approximately 20 cm (8 inches) above a light coloured surface. c) Make sure that the bar tip sprocket turns freely and that the lubricating hole in the guide bar tip sprocket is not blocked. Clean and lubricate if necessary. 4. If the saw chain lubrication does not work after following the steps above, speak to your servicing dealer. 1065 - 007 - 27.09.2021 31
-
 1
1 -
2
-
3
-
4
-
5
-
6
-
7
-
8
-
9
-
10
-
11
-
12
-
13
-
14
-
15
-
16
-
17
-
18
-
19
-
20
-
21
-
22
-
23
-
24
-
25
-
 26
26 -
 27
27 -
 28
28 -
 29
29 -
 30
30 -
 31
31 -
 32
32 -
 33
33 -
 34
34 -
 35
35 -
 36
36 -
37
-
38
-
39
-
40
-
41
-
42
-
43
-
44
-
45
-
46
-
47
-
48
-
49
-
50
-
51
-
52
-
53
-
54
-
55
-
56
-
57
-
58
-
59
-
60
-
61
-
62
-
63
-
64
-
65
-
66
-
67
-
68
-
69
-
70
-
71
-
72
-
73
-
74
-
75
-
76
-
77
-
78
-
79
-
80
-
81
-
82
-
83
-
84
-
85
-
86
-
87
-
88
-
89
-
90
-
91
-
92
-
93
-
94
-
95
-
96
-
97
-
98
-
99
-
100
-
101
-
102
-
103
-
104
-
105
-
106
-
107
-
108
-
109
-
110
-
111
-
112
-
113
-
114
-
115
-
116
-
117
-
118
-
119
-
120
-
121
-
122
-
123
-
124
 |
 |
