Husqvarna 540i XP with battery and charger Owner Manual - Page 27
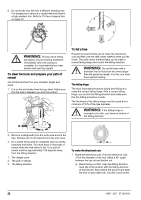
To do a check of the brake trigger, To do a check of the power trigger lockout
 |
View all Husqvarna 540i XP with battery and charger manuals
Add to My Manuals
Save this manual to your list of manuals |
Page 27 highlights
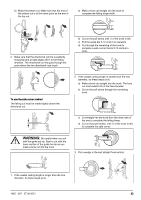
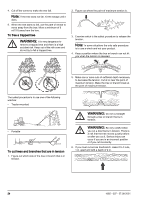
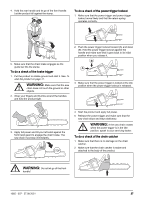
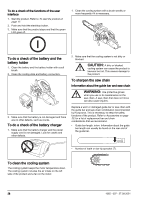
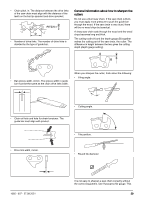
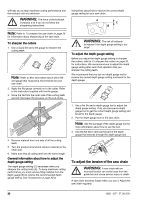
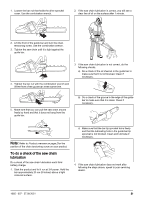
4. Hold the rear handle and let go of the front handle. Let the product fall against the stump. To do a check of the power trigger lockout 1. Make sure that the power trigger and power trigger lockout move freely and that the return spring operates correctly. 5. Make sure that the chain brake engages as the guide bar hits the stump. To do a check of the brake trigger 1. Put the product on stable ground and start it. See To start the product on page 17. WARNING: Make sure that the saw chain does not touch the ground or other objects. 2. Wrap your fingers and thumbs around the handles and hold the product tight. 2. Push the power trigger lockout forward (A) and down (B). Hold the power trigger lockout against the handle and make sure that it goes back to its initial position when you release it. B A 3. Make sure that the power trigger is locked at the idle position when the power trigger lockout is released. 3. Apply full power and tilt your left wrist against the front hand guard to engage the chain brake. The saw chain must stop immediately. 4. Start the product and apply full power. 5. Release the power trigger and make sure that the saw chain stops and stays stationary. WARNING: If the saw chain rotates when the power trigger is in the idle position, speak to your servicing dealer. To do a check of the chain catcher 1. Make sure that there is no damage on the chain catcher. 2. Make sure that the chain catcher is stable and attached to the body of the product. WARNING: Do not let go of the front handle! 1065 - 007 - 27.09.2021 27
-
 1
1 -
2
-
3
-
4
-
5
-
6
-
7
-
8
-
9
-
10
-
11
-
12
-
13
-
14
-
15
-
16
-
17
-
18
-
19
-
20
-
21
-
 22
22 -
 23
23 -
 24
24 -
 25
25 -
 26
26 -
 27
27 -
 28
28 -
 29
29 -
 30
30 -
 31
31 -
 32
32 -
33
-
34
-
35
-
36
-
37
-
38
-
39
-
40
-
41
-
42
-
43
-
44
-
45
-
46
-
47
-
48
-
49
-
50
-
51
-
52
-
53
-
54
-
55
-
56
-
57
-
58
-
59
-
60
-
61
-
62
-
63
-
64
-
65
-
66
-
67
-
68
-
69
-
70
-
71
-
72
-
73
-
74
-
75
-
76
-
77
-
78
-
79
-
80
-
81
-
82
-
83
-
84
-
85
-
86
-
87
-
88
-
89
-
90
-
91
-
92
-
93
-
94
-
95
-
96
-
97
-
98
-
99
-
100
-
101
-
102
-
103
-
104
-
105
-
106
-
107
-
108
-
109
-
110
-
111
-
112
-
113
-
114
-
115
-
116
-
117
-
118
-
119
-
120
-
121
-
122
-
123
-
124
 |
 |
